Thursday, 24 January 2013

Chinese Style Tossed Salad


"Why must be pay such an extorbitant price for cheap vegetables and artificial coloring?. Besides, we can hardly taste the salmon. This is a very high profit margin dish". That was my partner's remark to me after he turned down the waiter's suggestion of Yee Sang. Spoken like a true Penang accountant.


This incident happened some years ago at a Chinese restaurant during the Chinese New Year period. I will have to agree with my better half. I admit that I am a sucker for Yee Sang. I love it. The last time we had this salad at the same restaurant, the salmon was sliced so thinly and the portion size was so miserable. Hardly justified the price we paid. After all the tossing, you could  not taste or see the salmon at all.


I am not adept at handling seafood, let alone sashimi grade salmon. And I thought to myself, why not create my own version of Yee Sang. With my own dressing and instead of fish, I'll use roasted chicken. Of course I can't call it Yee Sang. That would be misleading as it does not contain fish and is miles away from the original thing. So I settled for Chinese Style Tossed Salad. How's that, eh?

The dressing came about months ago (way before this idea came up) when I wanted to recreate a ready made dressing that came with a packet of ready washed salad greens. The taste was lovely but the ingredients listed on the packet did not give me much of a clue as to what it actually contained. It only said something like bean paste and spices. 


Well, I just let the mad scientist in me prevail (My degree in biology came to great effect). I just mixed my ingredients (no test tubes involved) and tasted as I went along. I came quite close but not quite. But it was good enough for me.


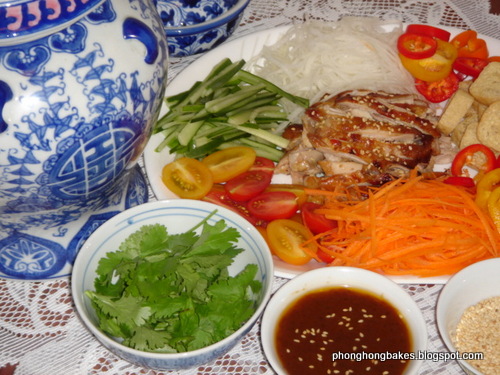
For the salad, I used cucumbers, carrots, daikon, crunchy sweet peppers, cherry tomatoes and corriander. For the crunchies, I toasted some taupok (beancurd puffs) and for the protein I used my Chilli Bean Roasted Chicken. The salad was pretty good if I may say so, as the dressing was tangy and full of flavors. The tossing of the salad was done in the kitchen of course because nobody is going to mess up my dining table. I'm such a party pooper hee..hee...


Chinese Style Tossed Salad
Recipe source : Phong Hong (Dressing was inspired by a store bought salad dressing)

Salad ingredients :
- 1 medium Daikon, grated
- 2 Carrots, grated
- 2 medium Cucumbers, cut into thin strips
- 10 Chery tomatoes, sliced
- 4 Sweet crunchy peppers, sliced
- Coriander leaves (cilantro)
- Chicken meat (from two chicken legs), thinly sliced (Can use roasted or steamed chicken)
- 5 Taupok (beancurd puffs), sliced and toasted in the oven at 180C for about 15 minutes until crispy (optional)

Dressing (Good for 2 big servings of salad) :
- 2 big cloves garlic (pounded)
- 1/2 inch ginger (pounded)
- 2 tablespoons honey
- 3 tablespoons bean paste (taucheow)
- 1 tablespoon dark soya sauce
- 1 teaspoon chili bean sauce (toban djan)
- 1 teaspoon plum sauce
- 200ml rice vinegar
- 100ml water

Additional ingredients for salad dressing :
- Sesame oil
- Grapeseed oil or any neutral tasting oil

For garnishing :
- toasted sesame seeds.

To make dressing :
- Pound garlic and ginger (or run through garlic press)
- In a saucepan add garlic, ginger, honey, bean paste, dark soya sauce, chili bean sauce, plum sauce, vinegar and water.
- Bring the dressing to a boil and lower heat to simmer for 10-15 minutes until dressing is slightly thick.
- Take it off the heat and cool.

To serve :
- Put salad ingredients into a mixing bowl.
- In another bowl, mix the dressing with 1 teaspoon sesame oil and 2 tablespoons of grapeseed oil
- Pour dressing into salad ingredients and toss to mix well.
- Sprinkle with toasted sesame seeds.

Notes : 
1. The dressing can be made in advance and kept in a bottle in the fridge for 2 weeks.
2. The amount of dressing to use depends on the amount of vegetables you are serving, so it is really up to you to decide how much is enough.  And this will also determine how much sesame and grapeseed oil you will add.
3. If you are using the taupok, toast it just before serving as it will get soft if left out for too long.


I am submitting this post to Chinese New Year Delights 2013 hosted by Sonia aka Nasi Lemak Lover.

Sunday, 20 January 2013

Sweet and Spicy Prawns


I am not really a fan of prawns especially if they are cooked in their shells. I don't like getting my hands dirty peeling them especially at the restaurant. But then again, prawns are a big thing during Chinese New Year for most people. And if you shell them first, they kind of shrink and won't look presentable for some dishes.


Don't get me wrong, I do enjoy the occasional prawn but I am just not super crazy about them. That is why when I saw this  Sweet and Spicy Prawns on K. Nor's blog, I just had to try it because it looked marvelous, just the sort of dish to serve for Chinese New Year.


Just to side track a little bit. During the MFF Terengganu event, K. Nor and I found out that we were primary school classmates. I still have our class photo when we were in standard 5  but I promised K. Nor that I would not show that photo to anyone else :) I enjoy reading her blog as Nor (we are the same age so I'm not supposed to call her Kak... hee..hee...) is still the same girl full of humour. She never fails to make me laugh. I am happy that my friend has a happy family and she has turned out to be an accomplished cook.


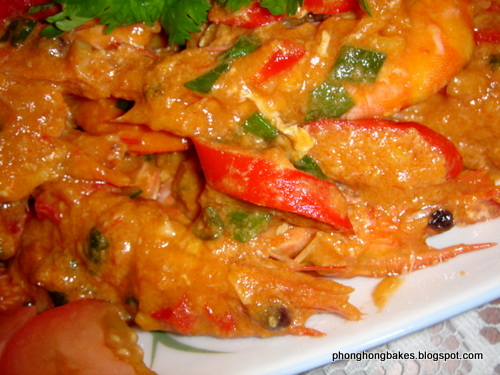
Now back to the marvelous prawns. Nor adapted her recipe from Gertrude's Sweet and Spicy Crabs and if you are a crab fan, do hop over. Me and crabs don't exactly get along, so I'll settle for the prawns. I find that this dish is delicious as the combination of garlic and ginger always works beautifully. The addition of a beaten egg at the last step makes the gravy very creamy and thick. However, after cooking this dish, I think I would prefer it without the egg although I did enjoy the creamy sauce. The dish was not spicy (hot) as I de-seeded the chilli.

Sweet and Spicy Prawns
Recipe source : Adapted from Secubit Garam (originally from My Kitchen Snippets)

Ingredients :
- 400g prawns (20 medium sized prawns)
- 3 cloves garlic, minced
- 1 inch ginger minced
- 1 red chilli, de-seeded and minced
- 3 sprigs spring onions, cut into 1/4 inch length
- 1 egg, beaten
- 1 red chilli, sliced (optional, I added this at the end)

For sauce :
- 4 tablespoons tomato ketchup
- 3 tablespoons sweet chili sauce
- 2 tablespoons black vinegar
- 1 tablespoon of light soya sauce
- 1 teaspoon cornflour dissolved in 2 tablespoons of water

Garnishing (optional)
- some tomato slices
- some corriander leaves

Method :
1. Mix all the sauce ingredients together and set aside.
2. Rinse the prawns and trim the feelers.
3. Heat oil in wok and saute the garlic, ginger and chilli until aromatic and garlic is slightly brown.
4. Add prawns and fry until prawns turn red.
5. Add sauce, cover the wok and lower heat.
6. Simmer for about 5 minutes until sauce is thick.
7. Drizzle in beaten egg and give it a good stir.
8. Add spring onions and sliced chilli and stir to mix.
9. Garnish with tomato slices and corriander. Serve immediately.


I am submitting this post to Chinese New Year Delights 2013 hosted by Sonia aka Nasi Lemak Lover.

Thursday, 17 January 2013

Ngaku Chips (Arrowhead Chips)


WARNING! Do not try this if you are on a diet especially low carb diet. Highly addictive, nobody can save you. Got it? In spite of prior knowledge of how dangerous these chips are, I still had to give it a go. Thanks to Wendy for the very informative post on how to make your own ngaku chips and save some money :)


RM12.00 bought from the ngaku chips auntie. Imported Doritos corn chips are cheaper.


Last year, my brother gave me a bottle of ngaku chips (something like the one above) together with some other goodies just before Chinese New Year. I stared at the chips and the chips stared back at me. And you can guess the outcome. I tore off the cellophane tape, removed the lid and lustily devoured the chips. Ngap..ngap...ngap...the whole container gone within 30 minutes (or was it 20?). I told you it is dangerous. Very dangerous.


Buying ready made ngaku chips is a lot more convenient but you have to be prepared to pay the price. I reckon it is expensive not because of the ngaku (it is cheap) but due to the labour cost. If you are really into ngaku chips, I highly recommend that you make it yourself if you can spare the time.

Sometimes, the commercial one smells of stale oil because some unscrupulous suppliers use recycled oil. When I dug into the bottle of commercial ngaku chips you saw up there, I was taken aback by the smell. A world of difference from the one I prepared myself. I won't be buying any more of the ready made stuff :)

I admit that it's a lot of hard work  requiring lots of time and patience. You'll realise this once you start peeling, slicing, drying and frying the chips. Like this :


This is how ngaku/arrowheads look like.

Peel using vegetable peeler.
I used a mandolin to slice. Not very well done.
Place a kitchen towel on a plate or tray and line up your ngaku slices.
Place another kitchen towel on top and use your palm to press the slices to soak up the moisture.
Fry in hot oil.
Drain on kitchen towels or newspaper.

By now, you'll sweat buckets standing at the stove and at some point regret that you started it. And the face of the ngaku chip auntie flashes before your eyes. She is staring at you with a satisfied look on her face and saying "See! That's why I'm selling at RM12.00 per bottle. Hmmph!".

All that hard labour will barely burn enough calories to make up for a measly helping of chips. Trust me. This stuff goes straight to your belly, hips and thighs. I know. I measured.


For this maiden attempt, I bought only a small amount of arrowheads. Just a small bag and I paid only RM2.10 for it. If there had not been so much wastage from my far from perfect slicing (and munching heh...heh.....), I could have made more than enough to fill the bottle which cost me RM12.00. See the margin? Sure, we need to consider the cost that the auntie incurred - wages for workers, oil, containers and distribution costs etc but still, it makes for a very healthy profit margin. Too healthy in fact.

I did encounter some technical glitches when preparing these chips, mainly with the slicing part. I guess using a mandolin does take some practice and my blade wasn't sharp enough. At some point I had to use a knife. Other than that, it is actually very simple. And one more thing, while you are slaving away, you must ban everyone from walking into the kitchen because they will start pinching the chips :)

The recipe below is taken from Wendy and you MUST check out her posting for detailed instructions and troubleshooting. Happy frying and don't say I didn't warn you :)


Ngaku Chips (Arrowhead Chips)
Recipe Source : Table For 2 .....or More

Ingredients :

1. Arrowheads, as many as you like
2. Salt
3. Oil for deep frying

Method :
1. Rinse the arrowheads and air dry them (or use a tea towel to dry them)
2. Peel the arrowheads and slice them thinly.
3. Dry each slice of the arrowheads using kitchen towel.
4. Heat oil in a wok and add some salt into the oil. Or you can salt the chips after frying them.
4. Deep fry in hot oil by dropping each individual slice of the arrowhead into the hot oil.
5. The chip is ready when there is no more visible bubbling of the oil surrounding it.
6. Remove from oil and drain on kitchen towels.

Notes on tips learnt from Wendy :
1. According the Wendy, she did not dry the arrowhead slices and her chips turned out fine.
2. Drop the arrowhead slices vertically into the deepest part of the oil. It will sink at first and then rise to the top.
3. Don't overcrowd the chips when frying and make sure they don't overlap or they will stick together.
4. Be patient, wait until the chips are properly fried before removing from oil or else they will be soggy.

You will notice my chips are slightly browner than the ones sold commercially. I prefer them that way because they taste better. But that's just me.


This goes very well with cold beer.

I am submitting this post to Chinese New Year Delights 2013 hosted by Sonia aka Nasi Lemak Lover.

Monday, 14 January 2013

Peach Yogurt Chiffon Cake


I tweaked my Pandan Chiffon Cake recipe to bake this Peach Yogurt Chiffon Cake. The use of peach yogurt was inspired by   Kimmy's Mango Yogurt Cottony Cake  which I tried here.

In my first attempt, I put 1 tub of yogurt (135ml) and noted that it wasn't enough. My egg yolk mixture became very thick after adding flour. I did not add another tub of yogurt at that point because it was in the fridge and adding a cold ingredient would not do.


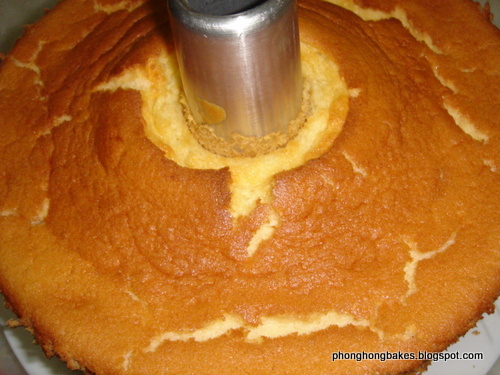
Second attempt. Some cracks but it doesn't matter.

I mixed some egg white mixture to lighten it up and folded the two mixtures together. The batter was thick and heavy but I baked the cake anyway. The cake did not rise very much in the oven. What came out was a chiffon with a rather dense texture. I could not detect any peach aroma but having said that, the cake was still edible. It was more like a sponge cake.


Flip bottoms up. Who cares about the cracks?

In the name of research and development, a second attempt was called for. This time with 2 tubs of yogurt. And it was perfect! The batter was light and smooth and rose beautifully in the oven. Not only that, the lovely peach aroma was present and the cake was light and moist.


Another thing I did was reduce the sugar content to take into account the sugar in the yogurt. I was very happy with the result and I will try other flavours soon.


Peach Yogurt Chiffon Cake
Recipe Source : Phong Hong as inspired by Cooking Pleasure


Mixture A :
1. 5 egg yolks
2. 270 ml peach flavoured yogurt (I used 2 tubs of Nestle yogurt)
3. 85ml vegetable oil
4. 50g sugar
5. 150g flour (I used superfine flour)

Mixture B :
1. 5 egg whites
2. 1/2 tsp cream of tartar
3. 50g sugar

Method :
1. Preheat oven to 160C

For Mixture A :
1. Whisk egg yolks with sugar to mix well.
2. Add yogurt and vegetable oil. Mix well.
3. Sift flour into the mixture and mix until a smooth batter forms.

For Mixture B :
1. Add cream of tartar into the egg whites and beat until foamy.
2. Add sugar gradually and beat until stiff peaks.

Pour Mixture A into Mixture B and fold the two batters to ensure that they are evenly mixed. Pour into chiffon pan and bake for 45 minutes. When done, remove from oven and invert pan. Cool completely before removing from pan.

Light, moist and airy.
One slice is not enough!

Thursday, 10 January 2013

Golden Chocolate Cupcakes


When I saw Ann's Mini Golden Chocolate Cakes, I was rather enchanted. The two toned mini cakes looked very appealing, one layer of chocolate and one layer of golden cheese. I had been wanting to use the cheese powder I purchased a few months ago and I thought this was the perfect opportunity. 


Unbeknownst to me, I was rather careless and did not check the ingredients in the cheese powder carefully. I only discovered to my horror that it contained onion powder after I baked the cakes. Yarrrgh!!!! (cilaka!) No wonder the cupcakes smelt a bit strange even though they tasted rather good. Onion and chocolate, no go! The recipients of the cupcakes were very polite, no complaints received so far. ghee...hee...hee...hee....


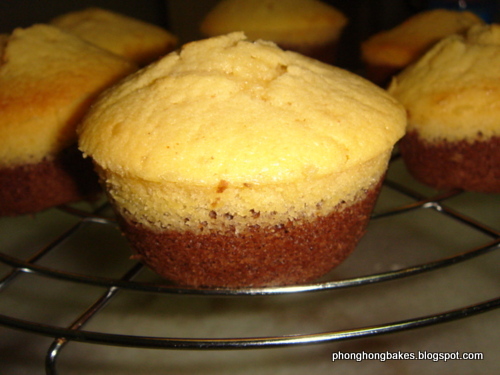
Whatever it was, I attempted the cakes again the next day because I was very impressed with the taste (in spite of the unintentional oniony undertones) and texture. The batter is creamy and smooth and the end product is a moist spongy cake. The combination of chocolate and plain batter is like eating a chocolate marbled butter cake. Very rich, moist and satisfying.


As some of you already know, dainty and mini are not in my vocabulary. Even my pharmacist complained that my Roti Paung is too big. I should make them much smaller like my auntie's. Oh well, some of us are not meant for small things :) Ann's recipe yields 24 mini cakes and since I wanted regular sized cupcakes, I simply doubled her recipe. I got 16 cupcakes and baked them in regular muffin pans without liners. This recipe is a keeper and I will bake these cupcakes again soon.


Golden Chocolate Cupcakes
Adapted from Anncoo Journal's Mini Golden Chocolate Cakes
Makes 16 regular sized cupcakes

Ingredients :
- 160g butter
- 160g sugar
- 2 teaspoons vanilla
- 4 tablespoons sour cream (or yogurt)
- 4 eggs
- 240g self-raising flour
- 30g cheese powder (I omitted in my second attempt)
- 120ml fresh milk
- 2 tablespoons cocoa powder mixed with 3 tablespoons hot water to make cocoa paste

Method :
1. Grease 2 muffin tins and set aside.
2. Sift flour and ddd cheese powder (if using). Mix well and set aside.
1. Cream butter and sugar until light and fluffy.
2. Add sour cream and mix well.
3. Add eggs one at a time and vanilla extract and mix well.
4. Add flour and milk alternately to the mixture and mix well.
5. Divide batter into two portions.
6. Mix one portion of the batter with the cocoa paste to yield chocolate batter.
7. Using a tablespoon, spoon one tablespoon of plain batter into each muffin cup and top with a tablespoon of chocolate batter. And you can alternate by spooning the chocolate batter first and then top with plain batter.
8. Bake at 160C between 20-25 minutes or until a skewer inserted into the centre of the cake comes out clean.

Note : The extra batter after filling up the 2 muffin tins were baked in cupcake liners after I was done with the first batch. I had a bit of fun swirling the two batters to get a marbled effect. 


Saturday, 5 January 2013

Chili Bean Sauce Roasted Chicken


I was craving for a honey roasted chicken so I mixed some  crushed garlic, honey, soya sauce and fish sauce for the marinade. In a moment of madness I decided to add some chili bean sauce (toban djan). I don't know why I did that, perhaps I was trying to be clever. After mixing the concoction, I immediately regretted it as it smelled very pungent. I had to do something. I could just toss the marinade out and start over but not being one to waste, I figured that ginger might help to lift that heavy smell. And I was right.


But still, it smelled quiet strong. I proceeded to marinate the chicken anyway as I remember, some marinades do transform once they are cooked. A good example being the yogurt based marinade I used for this Roast Chicken which smelled very sour at the outset but became very aromatic once the chicken was roasted.


I left the chicken to marinate overnight and the next day I took it out of the fridge for it to come to room temperature. It took slightly more than 2 hours before I proceeded to roast the chicken.

About 20 minutes into roasting, a lovely aroma greeted me when I entered the kitchen. There was a hint of honey and some other aromas I could not describe. Phew! Thank goodness the marinade worked out, or else I would be stuck with a weird smelling and tasting chicken.


Another thing that I do with the chili bean sauce is to use it by itself to marinate chicken pieces for a few hours and then steam the chicken. I garnish with spring onions before serving. 


Chili Bean Sauce Roasted Chicken
Recipe source : Phong Hong in a moment of madness

- 1 whole chicken
- 4 cloves of garlic (pounded)
- 1/2 inch ginger (pounded)
- 2 tablespoons honey
- 1 tablespoon light soya sauce
- 1 tablespoon fish sauce
- 1 tablespoon chili bean sauce
- 1 tablespoon oil

Method :
1. Clean the chicken and drain (or pat dry)
2. Pound or run the garlic and ginger through a garlic press.
3. In a mixing bowl add pounded garlic, ginger, honey, soya sauce, fish sauce, chili bean paste and oil. Mix well.
4. Place chicken into a freezer bag/plastic bag and pour in marinade and seal the bag.
5. Move the chicken around to spread the marinade evenly all over the chicken.
6. Place chicken in the chiller for at least 4 hours or preferably overnight.
7. Before roasting, take the chicken out and bring it to room temperature.
8. Preheat oven to 180C
9. Place chicken breast side down into a baking tray lined with aluminum foil.
10. Roast the chicken for about 40 minutes to an hour, basting every 15 minutes with the juices in the roasting pan.
9. Turn the chicken over after 30 minutes and continue to roast until golden brown and cooked through.

Tuesday, 1 January 2013

Avocado Milkshake with Chocolate Sauce


Happy New Year to all my friends and readers! It is now 2013 and it seems like only yesterday when the Y2K issue became such a hoohah back in year 2000. It has been 13 years since then, that's how fast time flies by.

Although the pessimist in me says "What's there to be happy about?", I resolve to be a more positive person this year. Looking back to 2012, I would say that my most significant achievement was learning how to bake. And of course, the creation of this blog, which has brought me much joy and introduced me to so many wonderful friends! Without further ado, lets get on to my first post for the new year.

If you haven't tasted this avocado milkshake, you don't know what you are missing. Thanks to my cousin SuperWeightKoalabear, I am now addicted to this evil concoction. When he left a comment on my Avocado and Chicken Salad post, he asked me if I have tried avocado with chocolate and gave me this link. I immediately checked it out and as usual, not being adventurous, I thought this was a weird drink. Avocado with milk and chocolate? Eeuuwww!!


But curiosity got the better of me. When I had dinner at Waterlily Bistro (you must go there!) I ordered the avocado milkshake and gingerly sipped it. Whoah!!! Power I tell you! It was creamy and yummy and yummy and yummy. So there! An instant convert and if I drink this too often I will be "superweight" too :)


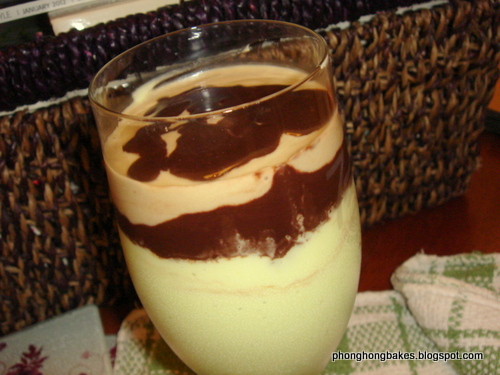
For the chocolate sauce, you can use the store bought one or use your own favorite recipe. I basically made the chocolate sauce from scratch by melting some chocolate with whipped cream and adding some water. Please be generous with the chocolate sauce when serving. The second time I had the milkshake at the restaurant, there was not enough chocolate in it and it did not taste as good as the first time :(

Top the milkshake with a scoop of vanilla or chocolate ice-cream for a more luxurious effect. I did not have any ice-cream on hand but I'll be sure to try that the next time.


Avocado Milkshake with Chocolate Sauce
Recipe source : Adapted from Resipi Citrasawan
Makes 2 servings

Ingredients
- 2 ripe avocados (I kept it in the fridge to make it cold, but it is not necessary to do that)
- 240 ml milk (cold from the fridge)
- 1 cup ice cubes
- Chocolate sauce
- Vanilla or chocolate ice-cream

Method :
1. Cut avocados into halves, remove seeds and scrape flesh into blender.
2. Add milk and ice cubes.
3. Blend until ice cubes are finely crushed.
4. Pour into serving glass and drizzle chocolate sauce generously.
5. Top with a scoop of vanilla or chocolate ice-cream .

Too bad I didn't have ice-cream.