Wednesday, 11 September 2013

Cajun Chicken Pasta (Ree Drummond)


This is the ultimate comfort food. Really. I was home taking another day off from work to recover from my slipped disc. Surely you don't expect me to be moping around the house wallowing in misery, do you? So I did what I love best - cook! I mean, I had to eat, right?


I was very attracted to this colorful pasta dish and the fact that it uses Cajun spices made it even more alluring to me. This time, I behaved myself and followed the recipe except for the wine part. I don't have any white wine in the house. And I used spaghetti instead of fettuccine and coriander instead of parsley.


When I opened this bottle of Cajun seasoning, I licked the protective foil for a taste. It was very spicy and salty. Yum! Another reason why I chose to cook this dish is because I had some red, green and yellow capsicum leftover from cooking Sunday Night Stew.


I was at first contemplating omitting butter and cream from the recipe as I am generally averse to these two ingredients except in cakes and bakes. I don't like creamy pastas as I find the smell of butter, cream and cheese too strong. However, I decided to take a leap of faith this time and used butter when sauteing the chicken and vegetables. 

Creamy sauce.

The smell of the Cajun spice coated chicken being browned in olive oil and butter was wonderful. And later, when I added cream to the sauce, I found the smell to be very appetizing. This made me think that my prior bad impression was probably due to less that fresh butter or/and cream being used in the food I ate at the restaurant.


After tossing the pasta in the sauce, I had a taste. Wow! I loved it! I did not have any parsley, so I sprinkled chopped coriander into the pasta. And it tasted even better. I went on an overdose of coriander as it is my favorite herb. My dad thinks that coriander smells like stink bugs. Does it?

A forkful of heaven!

I was very happy, in carbo induced delirium, as I tucked in into my big bowl of pasta. This is soooo......gooooood!!! Definitely a dish that I would repeat in the near future and one that would make its appearance at my next family gathering :)

I love this with loads of coriander.

Cajun Chicken Pasta
Recipe source : Ree Drummond
(My notes and adaptations in red)

Ingredients :
- 3 whole boneless, skinless chicken breasts cut into cubes (I used 8 strips chicken fillet)
- 3 teaspoons Cajun Spice Mix, more to taste (I used a lot more)
- 1 pound Fettucine (I used 250g spaghetti)
- 2 tablespoons Olive Oil
- 2 tablespoons butter
- 1 whole green bell pepper, seeded and sliced (I used half)
- 1 whole red bell pepper, seeded and sliced (I used half and another half of yellow pepper)
- 1/2 whole large red onion, sliced (I used one whole big onion)
- 3 cloves garlic, minced (I used 4 big cloves)
- 4 whole Roma tomatoes, diced (I used 1 Roma tomato)
- 2 cups low sodium chicken broth (I used chicken stock cube dissolved in 1 cup hot water)
- 1/2 cup white wine (I omitted)
- 1 cup heavy cream (I used 1/2 cup)
- Cayenne pepper to taste (I used chilli powder)
- Freshly ground black pepper, to taste
- Salt to taste (I did not need salt)
- Chopped fresh parsley to taste (I used coriander)

Method :
1. Cook pasta to package directions. Drain when pasta is still al dente; do not overcook!
2. Sprinkle 1.5 teaspoons Cajun spice over chicken pieces. Toss around to coat.
3. Heat 1 tablespoon oil and 1 tablespoon butter in a heavy skillet over high heat.
4. Add half the chicken in  a single layer; do not stir. Allow the chicken to brown on one side, about 1 minute. Flip to the other side and cook an additional minute. Remove with a slotted spoon and place on a clean plate. Repeat with remaining chicken. Remove chicken, leaving pan on high heat.
5. Add remaining olive oil and butter. When heated, add peppers, onions and garlic. Sprinkle on remaining Cajun spice, and add salt of needed. Cook over high heat for 1 minute, stirring gently and trying to get the vegetables as dark/black as possible. Add tomatoes and cook for an additional 30 seconds. Remove all vegetables from the pan.
6. With the pan over high heat, pour in the wine and chicken broth. Cook on high for 3 to 5 minutes, scrapping the bottom of the pan to deglaze. Reduce heat to medium low and pour in cream, stirring/whisking constantly.
7. Cook sauce over medium-low heat for a few minutes, until cream starts to thicken the mixture.
8. Taste and add freshly ground black pepper, cayenne pepper, and/or salt to taste. Sauce should be spicy.
9. Finally, add chicken and vegetables to sauce, until mixture is bubbly and hot. Add drained fettuccine and toss to combine.
10. Top with fresh parsley and chow down!


I'm linking this post to Cook Like a Star, an event co-hosted by Zoe of Bake for Happy KidsBaby Sumo of Eat Your Heart Out and Mich of Piece of Cake. The featured chef for the month is Ree Drummond.

Monday, 9 September 2013

Tomyam Fried Rice and My Lucky Streak....


Last week I finally went to consult a doctor to get my back fixed. I was diagnosed with a slipped disc. The good doctor performed a few tests, did an x-ray and prescribed me with anti-inflammatory drugs and a session of physiotherapy. I am happy to say that I am recovering very well and I am back in action (albeit in slow motion). Many thanks to my mum for her prayers, my partner for his love and support and all of you for your get well wishes.

Recently I have been experiencing a bit of good luck (except for the slipped disc hah! hah!). In April 2013, I won Shannon's Sunkist Kitchen Goodies Giveaway and again in June 2013 I was one of the lucky winners of Shannon's Nourish Magazine Giveaway. And when I went back to work on 3 September 2013 (7th day of my backache), this was sitting on my office table :


It was Yen's Worldfoods Giveaway. Actually I won because the winner did not claim her prize and Yen did a re-draw and lucky me was picked :) Inside the package was a bottle each of Worldfoods Tom Yum Paste, Indian Tikka Masala Stir-Fry Sauce, Thai Green Curry Paste and Thai Sweet Chilli With Kaffir Lime Dipping/Stir Fry Sauce.


Not only that, there was also a beautiful black apron, a recipe note book and a recipe card. All that certainly cheered me up a lot as I was quite miserable coping with the backache. Thank you, Yen! And thank you Worldfoods!


Now that I am feeling a whole lot better, I have decided to try the Tom Yum Paste first. Oh no, the Worldfoods products are not going to sit pretty on my pantry, I am putting them to good use! When I tasted a bit of the tom yum paste, initially it did not make an impression on me. It was quite mild and the saltiness was just nice. That gave me an indication that I needed to add cili padi to heat things up and I might not need to add anymore salt to my fried rice. 


When I sauteed the tom yum paste, the smell was wonderful. I am very pleased to say that the tom yum fried rice turned out very well. It was very tasty, thanks to the very flavorful and aromatic tom yum paste. Though not impressive right out of the bottle, sauteing the paste brought out all its goodness. For someone who is skeptical about ready made pastes and sauces, I will have to say that I would not have any reservations using ready made stuff once in a while. Good quality ingredients and a well balanced blend makes for a good spice paste.


And to up the ante, I poured some of the Worldfoods Thai Sweet Chilli with Kaffir Lime Sauce on my fried rice (this was in addition to my two cili padi) and oh, very nice! This sauce is very mild on the hotness scale and I find the kaffir lime aroma quite mild too. But I think this is a good move by the manufactures because the consumer would then be able to make their own adjustments by adding more chilli and fresh kaffir lime leaves to enhance the flavors. Not everyone can withstand too much heat and some people may find the smell of kaffir lime too strong.


I really enjoyed my fried rice and I can't wait to try the other sauces soon.


Tom Yum Fried Rice
Recipe source : Phong Hong

Ingredients :
- 3 cups overnight cooked rice
- 2 cups long beans, cut onto 1/2 inch length
- 1 big onion, thinly sliced
- 2 cloves garlic, chopped
- 3 strips chicken fillet, cut into cubes and marinated with 1 tablespoon fish sauce
- 10 prawns, peeled and deveined
- 2 tablespoons Worldfoods Tom Yum Paste (or more!)
- A handful of coriander leaves
- 4 young kaffir lime leaves, thinly sliced
- Fish sauce to taste
- Cooking oil

Method :
1. Heat oil in wok and saute onions until wilted.
2. Add garlic and continue to saute until fragrant.
3. Add tom yum paste and saute until aromatic.
4. Add chicken fillet, fry until cooked followed by the prawns. If ingredients appear dry, sprinkle some water into the wok.
5. When prawn change color, add the long beans and fry until they are tender but still crisp.
6. Add rice and stir to coat evenly with the tom yum paste and other ingredients. Taste and add fish sauce if necessary.
7. Lastly, add the coriander leaves and young kaffir limes leaves, toss and serve.

Note : I served with cili padi on the side and Worldfoods Thai Sweet Chilli with Kaffir Lime Sauce.


Friday, 6 September 2013

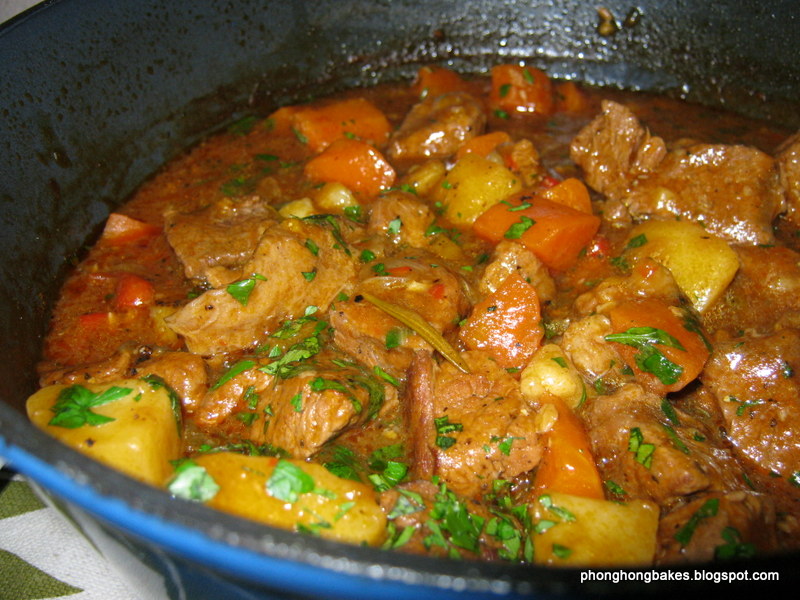
Sunday Night Stew (Ree Drummond)


Ree Drummond aka The Pioneer Woman is my favorite cow girl. I have been following her blog way before I started my own. What led me to Ree was my search for an alternative Buttermilk Sheet Cake recipe. I love Ree's writing style, she has loads of wit and humor. I enjoy reading her posts and I find her very entertaining. Besides her amusing narrative, Ree is an accomplished photographer and I am drawn to the beautiful shots of her food. I also love the step by step instructions which are often accompanied by her funny remarks.


Although much impressed by Ree and admiring her many bakes and dishes, somehow I have never made any attempt to try her recipes until now. I am very pleased that Ree is featured in this month's Cook Like a Star. Finally, I am trying Ree's recipes and I have chosen this Sunday Night Stew as my first attempt.


Ree wrote in jest that you have to cook this stew on a Sunday to be able to call it Sunday Night Stew. She is a funny gal! I cooked this stew last Sunday (in keeping with Ree's condition hah! hah!) in the midst of day 5 of my backache

I love stews and Ree's looked very hearty and delicious, accompanied by her very luxurious mashed potatoes which has cream cheese in it. I skipped the mashed potatoes and decided to add potatoes to the stew instead.


I did not follow Ree's recipe to a tee and improvised just a tad as I went along. I did not salt the beef but only peppered them as I prefer to add my salt at the end of cooking. I also added a sprig of rosemary when sauteing the onions together with some red, green and yellow capsicums as I love the flavors and sweetness that they bring. And in place of turnips, I added potatoes. I did not use beef stock as I find the smell too strong. I simply added water.


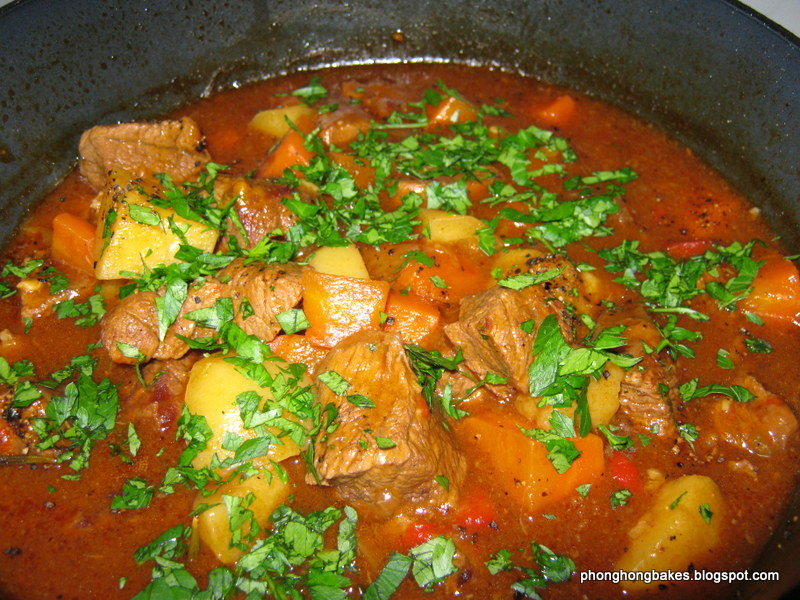
It took me 3 hours of stewing. I added the carrots and potatoes after 2 hours and when the stew was ready, the gravy was still runny. I thickened it with cornflour before adding the chopped Italian parsley. The stew looked very good and the color was excellent. 


I tasted a spoonful and wanted to pump my fist in the air and let out a loud "Yeehaw!!!".  But that would have have sent a jolt of pain down my bad back and a loud "Yeeouwch!!!" which is frankly, not very cool. This is by far the best beef stew I have ever cooked. Well, Ree said her stew was marvy and I am proud to say, so was mine! 


Sunday Night Stew
Recipe source : Ree Drummond
(My notes and adaptations in red)

Ingredients :
- 3 tablespoons olive oil
- 1 tablespoon butter (I omitted)
- 2 pounds beef stew meat (chuck roast cut into chunks)(this is approximately 907 grams and I used about 1 kg)
- Salt and pepper
- 1 whole medium onion, diced (I used 2 big onions, sliced)
- 3 cloves garlic, minced (I used 6 cloves)
- 4 ounces, weight tomato paste (I used 2 tablespoons)
- 4 cups low sodium beef stock or broth, more if needed for thinning (I used 750ml water)
- Several dashes of Worcestershire sauce (I used 2 tablespoons)
- 1/2 teaspoon sugar (I omitted)
- 4 whole carrots, peeled and diced (I used 1 big and 1 medium sized carrots)
- 2 whole turnips, peeled and diced (I used 6 chat potatoes)
- 2 tablespoons minced fresh parsley
- half a green, red and yellow capsicum, sliced
- 1 sprig rosemary
- 1 tablespoon granulated chicken stock 
- 3 teaspoons of cornflour mixed with some water, to thicken the stew

Method :
1. Salt and pepper stew meat (I peppered only).
2. Heat olive oil in a large, heavy pot over medium high heat. Add butter (if using) and as soon as it melts, brown half the stew meat until the outside gets nice and brown, about 2 minutes (Turn it as it browns). Remove the meat with a slotted spoon and put it on a plate. Add the rest of the meat to the pot and brown it too. Remove it to the same plate. Set the meat aside.
3. Add the onion and garlic to the pot, stirring it to coat it all the brown bits in the bottom of the pot (I also added the rosemary and sliced capsicums). Cook for two minutes, then add the tomato paste to the pot. Stir it into the onions and let it cook for two more minutes.
4. Pour in the beef stock (or water), add the Worcestershire and sugar. Add the beef back to the pot, cover the pot and reduce the heat to low. Simmer, covered for 1.5 to 2 hours.
5. After 1.5 to 2 hours, add the diced turnips (or potatoes) and carrots to the pot. Stir to combine, put the lid back on the pot and let it simmer for another 30 minutes. The sauce should be very thick, but if it seems overly so, splash in some beef broth until it thins up enough. Feel free to add beef broth as needed. (My stew was not thick, maybe I should have add less water. I thickened with cornflour)
6. When the carrots and turnips (or potatoes) are tender, stir in minced parsley. Taste and add salt and pepper as needed (I added chicken stock and pepper). Serve in a bowl of with mashed potatoes, letting the juice run over everything. Sprinkle with extra minced parsley at the end.
(I did not make the mashed potatoes)


I'm linking this post to Cook Like a Star, an event co-hosted by Zoe of Bake for Happy KidsBaby Sumo of Eat Your Heart Out and Mich of Piece of Cake. The featured chef for the month is Ree Drummond.

Monday, 2 September 2013

Stir Fried Longs Beans with Dried Prawns and Aaauuwwch!!!!


Last Wednesday, I had an episode. An episode of what, you ask? Some drama on the home front - I threw out my back. I was peacefully watering the garden while waiting for my partner to pick me up. Then I bent down to pull out a weed from a flowerpot. "Pop!" That's what I felt in my lower back and the "pop!" was accompanied by a sharp pain that made me want to lie down on the driveway. But I couldn't do that of course because (i) the driveway was wet, (ii) my neighbors would freak out and (iii) my partner would freak out.

So I squatted down to ease the pain. I should have stayed down longer for my back to settle, but I got up, very slowly. I was in pain but I managed to shuffle to the garden tap to turn off the water. I knew I was in trouble. When my partner turned up, I told him I had to take a day off.

I went upstairs and painfully lowered myself on my bed. Lying down eased the pain but of course I could not lie down the whole day. I got up, with much pain and went to my study room and sat down. I basically alternated between my bed and the chair. Every time I lowered myself on the bed or the chair, I would let out a cry. Same thing when getting up. Auuuwch!!!! AAAAAuuuuuwwch!!!! Even sneezing or coughing would leave me in agony.

Certain maneuvers in the bathroom would elicit loud yelps of pain. Waarghhhh!!!! And at times I would grunt like a pig. Ermghh!!!! Ermghh!!!! I wonder if my immediate neighbor heard me. They must be wondering what's up with next door?

The next day, I was still in pain but it was manageable. I went to work as I had many things to take care of. Sitting at my desk (with intervals of walking to the copier and the toilet) did take it's toll as I experienced discomfort and pain at the end of the day. The next day, Friday, I bravely went to work in spite of the pain. At about 3:00pm, I had to give up. I was almost in tears and my partner had to send me home.

When I reached home, getting out of the car was sheer torture. Waaarghhh!!!! My partner joked to cheer me up "You sound like you are having a baby! Twins!". But laughing caused stabbing pains. "Don't make me laugh!", I pleaded. But my guy is a funny guy and when he lets out the funnies he can't stop and I can't stop laughing. So I burst out in tears because of the pain. When I closed the door behind me, I sobbed my heart out. I guess it is one of the ways to relief the pain.

And to make matters worse, there was a major water disruption and I discovered that the tap had run dry at 6pm. The bathroom of course was still working as it was running on the storage in the water tank. Since I was unable to cook or go out to eat, my partner packed our dinner home. That evening, I was supposed to attend my Tua Pek's (my dad's eldest brother) 80th birthday party. I was looking forwards to the event to meet and catch up with my cousins and other relatives. Sadly, I had to cancel.

Anyway, to cut the long story short, the water supply came back on Saturday evening much to my and everyone's relief. As of today, my back still hurts but it is getting better, slowly but surely. From experience, I know that it would take at least 2 weeks or more for me to get back to normal.

So, I leave you with this very easy but delicious vegetable dish. Back home, I remember my Grandma would stir fry long beans with garlic and salt. My Mum does the same and we love our long beans. And I prefer the long beans to still have some crunch to it. Most of the time at the "chap fan" (mixed rice) stalls, the long beans are overcooked. Yuks!

Simple ingredients.

I love long beans a lot and besides stir frying, it is also very good in assam fish, fried rice and vegetable curries. The addition of dried prawns to the usual salt and garlic makes this simple vegetable dish a lot tastier. I also added some red chillies to the dish. I can just eat this on it's own with rice.


I have not given any measurements as this recipe is so simple and you can just "agak-agak" (estimate) yourself. If you don't hear from me after this post, it would mean that I am still nursing my injured back. I hope to spring back to action soon. I miss cooking and baking :(

Stir Fried Long Beans with Dried Prawns
Recipe Source : Phong Hong

Ingredients :
- Long beans cut into 1" length
- Garlic, crushed and peeled (leave whole)
- Dried prawns, soaked and drained
- 1 chillie, sliced (optional)
- Fish sauce (to taste)

Method :
1. Heat oil in wok and fry garlic briefly till it is slightly brown.
2. Add dried prawns and fry till fragrant.
3. Add long beans and stir until tender but still crispy.
4. Add a dash of fish sauce to taste and serve.

Saturday, 31 August 2013

Cajun-style Spicy Pickled Quail Eggs


You are probably wondering why on earth am I making pickled quail eggs again after my not so successful attempt here. Well, you know me. I don't know when to give up :)


I searched the internet again for another recipe and found Cajun-style Spicy Pickled Quail Eggs. I had to give these pickled eggs another go before deciding if it was good or not. This time round some of the ingredients were slightly different. Rice vinegar is used instead of white wine vinegar. And then there is coriander seeds, chili flakes and cane syrup. Other common ingredients are whole peppercorns, allspice berries and of course, salt.


I had all the ingredients except for cane syrup, allspice berries and chilli flakes. So I had to improvise again and substituted with honey, fennel seeds and sweet paprika. The smell of the pickling liquid this time round was much better, vinegary with hints of the aromatic bay leaves and spices.


I boiled 30 quails eggs but 4 were unusable because I exposed the yolks accidentally while peeling. But they were not wasted, they went straight into my mouth :) 

Since the Egg theme on LTU will end today, I am tasting the eggs one week shy of the recommended pickling time. Hmmm.....not bad, way better than the first recipe. I wish that the spices had a stronger aroma, maybe my spices were not so fresh when I used them. I believe with a bit of tweaking, this recipe could work for me. Next time, I will make sure that my spices are fresh so that they would exude  a stronger aroma and I would add more honey to lessen the tartness of the vinegar. These pickled eggs would be a good addition to my salad. No waste this time. I am eating the pickled eggs!


Cajun-stye Spicy Pickled Quail Eggs
Recipe source : Green Basket
(My adaptations and notes in red)

Ingredients :
- 2 dozen quail eggs, at least a week old (this is to make sure it is easier to peel)
- 1.5 cups rice vinegar
- 1/4 cup water
- 2 tsp cane syrup (I replaced with honey)
- 1 tablespoon whole peppercorns
- 1 teaspoon whole allspice berries (I replaced with fennel seeds)
- 2 bay leaves
- 1 tsp chilli flakes (I replaced with 1 teaspoon sweet paprika)
- 1/2 teaspoon coriander seeds
- scant teaspoon salt

Method :
1. Sterilize a pint jar (I used 2 old St Dalfour jam jars)
2. Put eggs in a pan, cover with water. Bring to a slow boil, turn off and plunge them in ice water. If you cook the eggs too "hard" they'll get rubbery in the brine. As soon as they're cool enough to handle, peel them carefully and set aside to cool and dry. (I simmered the eggs for about 5 minutes)
3. Combine rice vinegar, spices and salt in a small pan and bring to a furious boil. Set aside and let cool.
4. Carefully pack the eggs in the clean jar. They won't quite fill up.
5. Strain the brine and take out the bay leaves and coriander seeds and carefully poke them down among the eggs with a chopstick. Be careful not to break the eggs or the exposed yolk will make the brine murky.
6. Then pour the brine over until the eggs are completely covered, and finally scatter the remaining spices from the brine over the eggs with a spoon.
7. Cap the jar tightly and gently shake to make sure tthe spices are distributed evenly.
8. Store in the fridge for two weeks before serving.

Photobucket

This post is linked to the event, Little Thumbs Up organised by Zoe of Bake for Happy Kids and Doreen of My Little Favourite DIY and hosted by Baby Sumo of Eat Your Heart Out.

Friday, 30 August 2013

Pickled Quails Eggs


When I was a little girl, I was fascinated with quails eggs. To me, they were baby eggs and I was always delighted if I found them in any dish. They have a distinct taste and are very tasty.

When I bought the book Your Cooking Questions Answered, I was very curious when I saw this recipe. Pickled Quails Eggs was suggested as a Christmas gift. I looked at the pickling ingredients and some of them are not what I readily have in my pantry like mace and yellow mustards.

Pickling liquid.
I did a search on the internet and found other variation to the recipe. Some use whole allspice, bay leaves and tarragon. I did not want to go and get these ingredients as I may not use them again. For the sake of satisfying my curiosity about pickled eggs, I decided to improvise by adding whatever ingredients that I had on hand.


When I boiled the pickling liquid, it was quite fragrant initially due to the orange zest. But after a while, it smelled strange. Reminded me of dettol soap, yikes! I used 30 quails eggs and they fit perfectly into the bottle. After pouring in the pickling liquid, I still had some leftover. Not wanting to waste, I decided to boil 3 chicken eggs and pickle them too.


The pickled eggs looked rather attractive in the bottles. One week later, it was time to taste. I tried the quails eggs. The texture of the egg was rubbery. It was sour and salty with a strong and not so pleasant orangey aroma. I can't say that it was bad but at the same time I wasn't thrilled by the taste either. Perhaps, this is due to me substituting the ingredients or this pickle is an acquired taste. Pretty much like century eggs, some people find it disgusting while other like me have no problem gobbling them up.


I was thinking maybe the pickled eggs would go well in a salad or eaten with another dish. They might be nice as part of a sandwich. I did try them in my sandwich but unfortunately, that spoiled my sandwich :( I have kept the eggs in the fridge after opening the bottle. The recipe says it is best to use them within a month. But they have all gone into my compost bin. Try at your own risk.


Pickled Quails Eggs
Recipe source : Your Cooking Questions Answered (page 269)
(My notes and adaptations in red)

Ingredients :
- 1 teaspoon whole mixed peppercorns (I used black, white and Szechuan)
- 2 dried red chillies
- Small piece fresh ginger, peeled and finely chopped
- 1 blade mace (I replaced with a bay leaf)
- A pared strip of orange zest
- 1 teaspoon yellow mustard (I used black mustard)
- 1 teaspoon sea salt
- 600ml white wine vinegar (I used distilled vinegar)
- 24 fresh quails eggs (I used 30)

Method :
1. Put all pickling ingredients except eggs into a pan.
2. Bring to a boil, then remove from heat and leave for at least 2 hours or until cold.
3. Hard boil the eggs for 3 minutes, plunge them into cold water and peel them when cool.
4. Pack the eggs into a sterilized jar.
5. Strain the spiced vinegar through muslin, then pour it over the eggs so that it covers them completely.
6. Seal with non-metallic vinegar-proof lids and store in a cool, dark place for a week before using.
7. It is best to use them within a month.


Photobucket

This post is linked to the event, Little Thumbs Up organised by Zoe of Bake for Happy Kids and Doreen of My Little Favourite DIY and hosted by Baby Sumo of Eat Your Heart Out


This post is also linked to Cook-Your-Books #3 hosted by Joyce of Kitchen Flavours.

Thursday, 29 August 2013

Vegetable Fritters


Vegetables are good for our health but this is not the way to eat them :) I made these fritters on the spur of the moment just to use up the leftover vegetables that were sitting in the fridge (or maybe it's just an excuse). That's the problem with me, I sometimes buy too much.


The grated carrots in the plastic container would be good for another day or two and then there's the alfalfa sprouts that didn't make it into my salad. A bit of coriander leaves here and some long beans there and all these went into my mixing bowl.


Looks like I am making salad, but I'm not.
I added some minced onions, some chives from my garden, an egg, self-raising flour, seasoning, loads of pepper and water. No recipe, just chucking everything in and adjusting the flour and water as I went along. And I am now a pro at making vegetable fritters after making Corn and Vegetable Fritters


This time round, my fritters were even better, crispier and tastier. Oh, I love the crunch when I sank my teeth into the first one. Yums! I must have got about 12 to 15 (didn't count) fritters and of course I can't eat them all. The remainder went into the fridge and was reheated in the oven the next day. Fresh is always best but the reheated fritters were crispy and still tasted very good.


For the recipe, please refer here and feel free to make adjustments to suit the amount of your ingredients.