Monday, 14 October 2013

Banana Carrot Cake


Banana and carrot? To me, that sounds like an unlikely partnership but of course that was before I ate this cake. I was itching to bake something when I saw this recipe in the book Blend It Well, Bake It Right by Chef KS Lee. 


It so happened that I had some ripe bananas and two carrots in the fridge. The other ingredients were pretty basic, just sugar, eggs, flour, baking powder and cinnamon powder. And what I like is that there is no frosting for this cake. 


I am always nervous when I try a new cake because the baking time is a headache for me. The recipe says 170C for 45 minutes but my oven can only handle cakes at 160C max. Another headache is sugar, to follow the recipe or to reduce. I am still a long way from being good at baking.


I did change the recipe just a little bit. The recipe called for margarine, but I am not keen on margarine. It will always be butter for me. I had an opened block of butter in the fridge and it weighed 200g, just 20g above the amount called for in the recipe. Not wanting to cut off 20g and stashing such a small piece of butter in the fridge, I used the whole lot. I also decided to add 1/2 a cup of raisins.

The recipe called for all the batter ingredients (except the carrots and bananas) to be whipped at high speed till smooth. I was scared of doing that so I stuck to the usual creaming of butter and sugar first before adding eggs and flour. I am such a coward when it comes to baking :)


Everything seemed to come along fine with the mixing of the batter. It took me quite a while to fold in the carrots, bananas and raisins. My oven was ready but I was still folding the batter. My auntie told me not to leave the oven on preheat for too long because the oven would become too hot. So I hurried up to pour the batter into the pan.


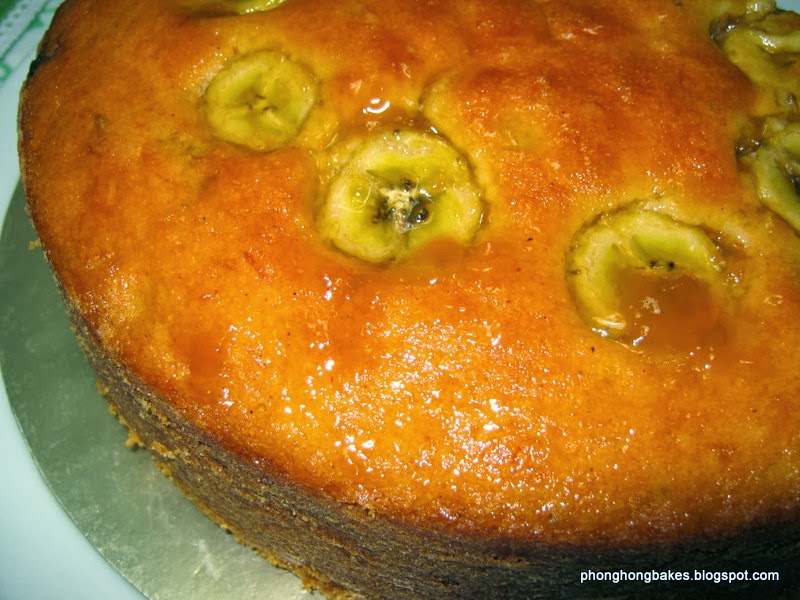
Then I quickly peeled a banana, sliced it and hastily arranged the banana slices on top of the cake. Because I was in a hurry, the arrangement was lopsided and not in a nice circle :(


I set the oven for 50 minutes but at the end of the baking time, the center of the cake was still wobbly but the top was already brown. I had no choice but to tent the cake and bake at 150C for another 10 minutes. Luckily, the cake turned out alright. I noted that the cake in the book has a shiny surface but no mention was made about glazing the cake. Perhaps it was done for photography purposes.


I read somewhere that jam is used as a glaze. So I heated up 2 tablespoons of peach jam and when the cake was cool enough, I happily glazed the top. I only tasted the cake the next day. I was very pleased because the cake was delicious. I felt that there wasn't enough carrots and bananas and I am thinking of adding more when I next bake this cake. I would also reduce the sugar as my partner found the cake a bit too sweet and so did I.


This cake is a keeper and I am very happy that I baked it. I exercised great restrain because I had only one slice. I wanted another slice very badly but I quickly packed up the rest to give away. My mum is right about baking - it is not a good hobby if you are trying to lose or maintain your weight!


Banana Carrot Cake
Recipe source : Blend It Well, Bake It Right (Page 35)
(My notes and adaptations in red)

Ingredients A
- 180g margarine (I used 200g butter)
- 150g sugar (to reduce to 140g in future)
- 4 eggs
- 260g plain flour (I used self-raising)
- 1/2 tsp baking powder (I omitted)
- 1/4 tsp cinnamon powder

Ingredients B
- 100g carrots (shredded)
- 100g mashed bananas
- 1 banana (sliced thinly for decoration)
- 1/2 cup raisins (my addition)

Method :
1. Combine all ingredients A in a mixing bowl and whip at high speed until smooth (I creamed the butter and sugar until light and fluffy and then added the eggs one by one. Then I folded the flour and cinnamon powder in).
2. Add ingredients B (except for banana slices) and mix well.
3. Pour batter into a lined baking mould. Arrange banana slices on top. (I used an 8" round pan).
4. Place in preheated oven and bake at 170C for 45 minutes until cooked. (I baked at 160C at 50 minutes and had to increase baking time for another 10 minutes at 150C).
5. Remove from oven and let cool for 10 minutes and unmould.


This post is also linked to Cook-Your-Books #5 hosted by Joyce of Kitchen Flavours.

Friday, 11 October 2013

Stewed Pork Belly with Fried Tofu


This is another good one from Ivy of Simply Beautiful and Healthy Living. I printed Ivy's recipe since the day she posted this recipe. After many postponements, I finally I get to cook this yummy dish and share it on this month's Little Thumb's Up.


This dish reminds me of Kay Hong because of the use of soya bean paste (taucheow) and dark caramel sauce (reminiscent of kayciap). But it is different because no shallots are used and it has cinnamon stick and star anise as aromatics. Besides, Kay Hong is pork belly cooked with chicken and hard boiled eggs and tofu is not an ingredient.


I eagerly waited for Saturday to come as I only get to cook on weekends. All my ingredients were in place or so I thought. As I was preparing the seasonings, I grabbed hold of the bottle of caramel sauce. My auntie gave it to me sometime last year and I had never opened the bottle. A quick glance at the expiry date showed 13 September 2013. Eeekksss!!!! I should have checked earlier. But I did remember reading somewhere that products are still good some 6 months after expiry. Shall I take the risk? I poured some of the sauce into a bowl and gingerly tasted a bit. Nice and sweet. No funny taste. It should be alright :)


Pan fried tofu. It is also nice eaten like this with chilli sauce.

I started off by pan frying 4 pieces of hard tofu which have been cut into cubes. My grandma used to deep fry tofu like this and we ate it with her homemade chilli sauce. Once the tofu was done, I sauteed the chopped garlic with the bean paste, cinnamon stick and star anise. The aroma was simply beautiful! It is the sort of smell that would get you very hungry and eager to eat lunch pronto!


Then it was the pork belly in together with the fried tofu and seasonings. All was easy after that as I left the dish to simmer until the pork was tender. As you can see, I have cut the pork much bigger than Ivy's. I should have cut them smaller so that they cook much faster. But you know me, I am not known to do things dainty. Even my cookies come in big chunks :)


I was very tempted to add hard boiled eggs (I bet they go well in this dish) but I wanted the tofu to remain the star of the show. If hard boiled eggs had been in there, you know they would be the focus point, at least in this house. And when the dish was served, I attacked the tofu first. And oh my, they were so good! As they were braised along with the pork, the tofu absorbed all the goodness of the delicious gravy. 


I am quite sure this dish would taste just as good with chicken for those who are unable to consume pork. This dish would go very well with plain rice porridge and of course white rice. I am not much of a gravy person and my dish was on the drier side. I suggest if you like loads of gravy with your rice, be sure to add a bit more water and adjust the bean paste and seasonings accordingly.


I have deviated slightly from Ivy's method of cooking. Firstly, I was too lazy to blanch the pork, secondly I sauteed the whole lot of the bean paste and lastly, I added the caramel sauce only at the end. This recipe is a keeper and a firm family favorite.  And to Ivy,  a very big thank you for this beautiful dish!


Stewed Pork Belly with Fried Tofu
Recipe source : Adapted from Ivy of Simply Beautiful and Healthy Living

Ingredients :
- 1 strip of pork belly (about 450g, cut into 1" strips)
- 4 pieces hard tofu, cut into 4 cubes each.
- 2 tablespoons fermented soya bean paste (taucheow)
- 1 bulb garlic, finely chopped
- 1 star anise
- 1 cinnamon stick
- water, enough for stewing (I added just enough to cover the ingredients, add more if you like more gravy and be sure to adjust your seasonings)
- 2 tbsp caramel sauce

Seasonings (to taste)
- 2 tbsp light soya sauce
- 1 tsp sugar


Method :
1. Pan fry the tofu cubes until golden brown. Drain on paper towels and set aside.
2. Heat oil in a wok and saute garlic, fermented soya bean paste, star anise and cinnamon stick until fragrant.
3. Add pork belly and stir fry until pork changes color.
4. Add the pan fried tofu, water and seasonings. Bring to a boil and simmer until pork belly is tender and gravy is thickened.
5. Add caramel sauce, stir to mix evenly and continue to simmer for another 5 minutes.
6. Serve with rice or plain porridge.


Photobucket

This post is linked to the event, Little Thumbs Up organised by Zoe of Bake for Happy Kids and Doreen of My Little Favourite DIY and hosted by Mich of Piece of Cake.

Tuesday, 8 October 2013

Spicy Tempeh with Bean Curd and Anchovies


My first introduction to tempeh (fermented soya bean cake) was at my university hostel cafeteria. That was 28 years ago. I was queuing up at the food counter with the standard issue plastic food tray. I saw this dark brown mass of something that looked like beef. Without a second thought, I scooped it into my tray and moved on to get my vegetables.


When I sat down to eat, I had my first taste of tempeh. I chewed on it and it had a peculiar taste. This can't be beef, the texture is different. I did not exactly like it immediately, it was just OK at that point. It was only later that I found out that it was tempeh and from then onwards, I was always fighting with the rest of the girls for the tempeh. Somehow it was THE most popular dish at the cafeteria. If you are late, very sorry, there will be none left for you. And I wonder why the caterer did not feature tempeh more often seeing that we girls loved it so much (I stayed in an all girls hostel).


Raw tempeh. The white stuff is fungal mycellium. Not harmful at all.

Fast forward to a few years later, whenever I bought food from the Malay stalls, I would be on the look out for tempeh. I was a tempeh addict :) Sometimes the stall would sell pieces of deep fried tempeh coated with turmeric and salt. And they also put tempeh in sayur lemak. My favorite is of course tempeh fried in sambal with tofu and ikan bilis (anchovies). This is one dish that  I can eat by the bowls! And I can never get tired of it. The only low point is the deep frying of the ingredients. But I am not eating this everyday, only once in a blue moon, so it should be alright.


Deep fried tempeh cubes. Delicious on its own with sweet chilli sauce.

There are many variations to this spicy tempeh dish. One of the most basic is just tempeh and ikan bilis like the one my big sister Kak Queenie cooked. And then there's the grand one with tempeh, tofu, ikan bilis, peanuts, sweet potato slices and glass noodles. Whichever way it is cooked, I love them all. The one I cooked is sort of halfway between the simple and luxurious. I skipped the peanuts and glass noodles.


And I must tell you about my maiden experience with ikan bilis. I have never fried ikan bilis my entire life and in another 4 more years, I will be hitting the big Hawaii Five-Oh. So before I reach that milestone, as a self respecting Malaysian, I must fry ikan bilis at least once, alright? I remember Kak Q said that you must wash the ikan bilis under running water until it is clean, drain it and then fry until it is crispy. The purpose of washing is obviously to get rid of dirt and impurities and also to wash away excess salt. I did that, gave it a big squeeze with kitchen towels so that the ikan bilis won't explode in my face when I drop it into the hot oil. 


All seemed to go well except that my ikan bilis was browning very fast but it was still not crispy. I think I did not drain it well enough. Or my fire was too big. If Kak Q could peep into my kitchen and see me murder the ikan bilis, she would be shaking her head and going "Kesian adik aku nih..." (my poor little sister). I removed the ikan bilis and transferred them to an enamel plate. Then I popped them into the oven without preheating at 200C. When the oven beeped, I roasted the ikan bilis for 5 minutes. I think Kak Q just fainted. Anyway, it worked because the ikan bilis turned crispy.


Deep fried and then roasted. Poor ikan bilis.

I think frying ikan bilis requires patience and I will do better next time. Practice, practice, practice! I was happy that the tempeh dish turned out well. It was a delicious walk down memory lane. Hopefully, I will master the art of frying ikan bilis. I will be cooking spicy tempeh again in the near future, with peanuts and glass noodles (yum!).  And I sure hope I won't mess up frying peanuts :)


Mixed Fried Tempeh Sambal
Recipe source : The New Malaysian Cookbook (Page 93)
(my note and adaptations in red)

Ingredients :
- 200ml oil
- 2 cakes beancurd (halved)(I cut into cubes)
- 150g fermented soybean cake/tempeh (thinly sliced)(I cut into cubes)
- 50g dried anchovies (cleaned & halved)(I used a handful)
- 40g transparent vermicelli/glass noodles/suun (soaked till softened)(I omitted)
- 80g groundnuts (I omitted)
- 2 tablespoons chilli paste (I omitted, see below)
- 50ml water (I used 2 tablespoons)
- 1-2 tablespoons thick asam jawa juice(tamarind juice) (I used 1 tablespoon)
- 1/2 teaspoon dark soya sauce (I used 2 tablespoons sweet soya sauce/kicap manis)
- 1 teaspoon sugar (I omitted)
- salt to taste (I omitted because the belacan was salty enough)

Blended ingredients :
- 5 shallots (I used 1 big onion)
- 2 cloves garlic (I used 4 cloves)
- 1 cm dried shrimp paste/belacan
- 1 fresh chilli and 2 dried chillies (soaked to soften)

Method :
1. Heat 150ml oil and fry the beancurd till light brown. Remove and drain well. Then slice thinly.
2. Heat the oil again and fry the fermented soya bean cakes till golden brown. Remove and drain well on paper towel.
3. Dry-fry groundnuts till crispy (skin should be dark brown). Set aside.
4. Deep-fry the anchovies till crispy. Remove and drain well.
5. Heat the remaining 50ml oil and stir fry blended paste, chilli paste and water till aromatic.
6. Mix in asam jawa, dark soya sauce, sugar and salt. Combine well.
7. Add in suun, bean curd, fermented soya bean cake and groundnuts. Mix thoroughly and cook till almost dry.
8. Season to taste, dish out onto a plate and serve.


Photobucket

This post is linked to the event, Little Thumbs Up organised by Zoe of Bake for Happy Kids and Doreen of My Little Favourite DIY and hosted by Mich of Piece of Cake.

Sunday, 6 October 2013

Spicy Beancurd


The theme on Little Thumbs Up is Soya Beans and that means we eat healthy this month! There are many soya bean products that we can work with like tofu, soya milk, soya bean paste, miso, tempeh (my favorite!) and even soya sauce. From savory dishes to desserts, the possibilities are endless with this very nutritious bean.


My dish for today comes from the book A Taste of Home by Andrew Kow. This Spicy Beancurd is a familiar dish in most Chinese restaurants. Not only is it simple to prepare but it is also very delicious. I love the combination of beancurd, meat and prawns in a spicy hot bean paste. Oh yes, two soya bean products in one dish!


The addition of cooking wine did a lot to enhance the flavor of this dish. When I dug in after the photo session, wow! I loved the taste and I will have to say that it tasted better than the ones I have eaten at some restaurants. Oh, oh! That's PH blowing her own trumpet again. No, no! Full credit goes to the recipe and not me. But never mind, you must try this dish and then you tell me if it tasted better than the one you had at the restaurant :)


Spicy Bean Curd
Recipe source : A Taste of Home (page 74)
(My notes and adaptations in red)

Ingredients :
- 2 boxes water bean curd (I used only one 250g box)
- 100g minced pork
- 100g shrimps
- 3 tablespoons spring onion dices
- 2 tubes Japanese beancurd
- 1 tbsp chopped garlic (I used 2 tbsp)
- some chopped ginger (I used 1 tbsp)
- some water

Seasonings :
- 2 tbsp chilli bean paste (doubanjiang)
- 1.5 tbsp tomato sauce
- 1/2 tbsp sugar
- some sesame oil (I used about 1 tsp)
- some Chinese cooking wine (I used 2 tablespoons)
- 1/2 tbsp pepper (I just added a dash or two)
- 2 tbsp light soya sauce

To thicken gravy :
- 1 teaspoon of tapioca flour mixed with some water.

Method :
1. Cut water bean curd and Japanese bean curd into pieces.
2. Heat up oil in pot, fry chopped garlic and ginger until fragrant.
3. Add minced pork and stir fry until meat changes color.
4. Add shrimps and stir fry until they change color.
5. Then add bean curds and seasonings and some water (not too much)
6. Stir gently to mix all ingredients well.
7. Braise until gravy is reduced and thicken with tapioca flour mixture.
8. Sprinkle spring onion dices and serve immediately.


Photobucket

This post is linked to the event, Little Thumbs Up organised by Zoe of Bake for Happy Kids and Doreen of My Little Favourite DIY and hosted by Mich of Piece of Cake.

Friday, 4 October 2013

My Simple Tom Yum Soup


My back still hurts if I over exert myself. So far I have undergone 9 sessions of physiotherapy. There is much improvement but I am still on the long road to recovery. Bearing this in mind, I have to keep my cooking light and simple.


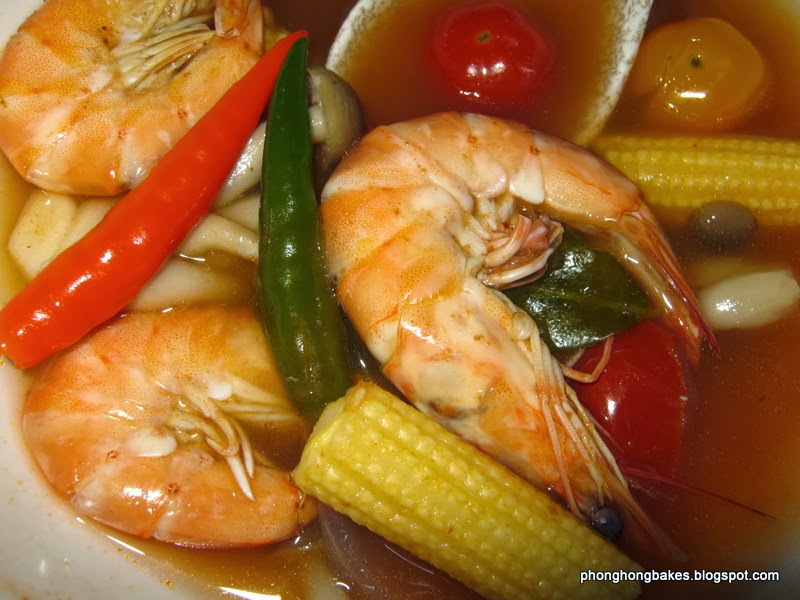
I still have some World Foods Tom Yum Paste in the fridge and I decided to quickly use it up before it expires. As I mentioned in my previous post, the tom yum paste is quite mild. For extra heat, I added 4 cili padi into my soup. I also added one fresh lemongrass, onions, garlic and kafir lime leaves. Fresh is always best and the ready made tom yum paste basically provides a convenient platform for you to work on but for added zing, I feel it best to add fresh aromatics.


You can basically put anything you fancy into the tom yum soup and usually seafood is the popular choice. I went for prawns, chicken fillet, cherry tomatoes, young corn and mushrooms. I did not have to add any salt as the tom yum paste is already salty enough for me. And I forgot about chicken stock hah! hah! I should have put some and then adjusted the tom tum paste accordingly as far as saltiness is concerned. There's always a next time :)


OK, confession time. Another reason I am having this tom yum soup is because I am making an effort to get back into my low carbohydrate eating plan. I have been happily eating carbs (in spite of my earlier pledge) especially so since cooking Ree Drummond on last month's Cook Like a Star. I love pastas, I love rice, I love breads, I love my mee goreng, I love cheesecakes......please somebody stop me! I have put on quite a bit of weight (adding on to the additional 15lbs I put back on sobs! double sobs! make that a triple!) and with my current restricted mobility, I can't exercise making things worse :(


I hope that I am on to a good start, but I am not going to be so extreme as to cut off my favorite carbs entirely. Moderation is the key word here. I will allow myself carbs but in limited amounts. There's no point depriving myself as this will lead me to rebel and break my resolve. Anyway, I was happy with my simple but very filling tom yum soup. And one of these days, I am going to make my own tom yum paste.


Tom Yum Soup
Recipe source : Phong Hong

Ingredients :
- 1 litre water
- 2 chicken stock cubes (I forgot about this and will put in future)
- 3 tablespoons ready made tom yum paste (or to taste)
- 1 stalk lemongrass, bruised
- 4 kafir lime leaves
- 1 big onion, cut into wedges
- 2 big cloves garlic, sliced
- Chicken fillet, cut into cubes
- Prawns, cleaned and feelers removed
- Young corn
- Cherry tomatoes, cut into halves
- Bunashimeiji mushrooms
- 4 cili padi, bruised (optional, only of you want some heat)
- Salt or fish sauce to taste (if your soup is not salty enough)

Method :
1. Put water into a pot and add lemongrass, kafir lime leaves, onions, garlic, cili padi, chicken stock cubes and tom yum paste. Bring to  boil and simmer for about 15 minutes.
2. Bring the soup up a to a boil and add chicken fillet, young corn, cherry tomatoes and simmer briefly until chicken is cooked.
3. Bring soup to a boil again and add prawns and mushrooms and continue to simmer until prawns are cooked.
4. Taste and add salt/fish sauce if necessary.
5. Serve immediately.


Wednesday, 2 October 2013

Stir Fried Chayote Shoots


Thanks to Ivy of Simply Beautiful and Healthy Living, now I know that this funny looking vegetable is called Chayote Shoots or Dragon Whiskers. I used to see this weird looking vegetable at the supermarket aisle and it reminded me of the alien in Predator. I think it is the curly tendrils that made this vegetable look so alien-like to me.


I also see Chayote Shoots sold at the "chap fan" (mixed rice) stall but I did not dare to try it lest I might not like the taste. But after reading Ivy's post, I was convinced that I would enjoy this nutritious green vegetable just as I do any greens. I love green leafy vegetables simply stir fried with garlic and salt.


I followed Ivy's recipe except that I pounded the dried prawns with the garlic and chillies. I find that Chayote Shoots have a tougher texture unlike spinach or mustard greens and therefore need slightly longer cooking time. The stems at the lower end are tough and fibrous and I discarded them.


I will have to agree with Ivy that this vegetable is indeed very tasty! And I am no longer afraid of it :) Ivy mentioned that it has anti-inflammatory properties and that should be good for me as my doctor prescribed me with anti-inflammatory medication to heal my slipped disc. Better to go the natural way than taking prescription drugs. I'll be looking out for this curious looking Chayote Shoots again at Aeon. I think it would also be delicious fried with belacan. Can't wait to try that!


I'm so fascinated with the curlies.

Stir Fried Chayote Shoots
Recipe source : Adapted from Ivy of Simply Beautiful and Healthy Living

Ingredients :
- 1 bunch Chayote Shoots (250g), tough stems removed
- 5 big cloves garlic (I love my garlic!)
- 1 red cili padi
- 1 heaped tablespoon dried prawns (soaked and rinsed)
- Fish sauce or salt to taste
- extra cili padi, sliced for garnishing

Method :
1. Wash and rinse Chayote Shoots and cut to desired length. 
2. Pound garlic, dried prawns and cili padi.
3. Heat oil in wok and saute the pounded ingredients until aromatic.
4. Add the Chayote Shoots and sprinkle some water for moisture.
5. Stir fry until the vegetable is tender. Season with salt or fish sauce to taste.
6. Serve immediately.

Note : I covered the vegetable to let simmer and stirred every now and then till tender.