Saturday, 30 November 2013

My Simple Chicken and Spinach Soup


I went shopping this morning in hopes of starting my Chinese New Year shopping early. Every year for the past 4 years, I have been telling myself not to wait until the last minute. Shopping at the eleventh hour is no fun. There are hundreds if not thousands of other shoppers doing the same thing and I get very disorientated when it gets too crowded. I hate crowds.


It was a relatively peaceful day in spite of the school holidays. I walked around 1-Utama and stopped at a clothes store. You know one of those that cater to the young and cool crowd, specifically underfed young girls. I looked at the sizes. XL was obviously not in their vocabulary but surprisingly XS is and even XSS (I hate you!). Can you imagine being extra small or extra extra small? Out of morbid curiosity I took out a pair of pants. The L size could jolly well be an S as far as I was concerned. That pant leg would never make it up my calf. Is this depressing or what? And that's not all. A promoter at Aeon, who's most probably on the wrong side of 38 called me Auntie. Hallo! Who is auntie? Of course I declined to try her product...tsk...tsk...tsk.....


I snuck in chicken feet for the collagen. I need all the help I can get.

It's so hard to lose weight. And heck, this morning I had two chungs (rice dumplings) which my partner brought back from Penang. Everything from Penang is good and I cannot resist. So for lunch today, I had chicken and spinach soup. Protein and vegetables, a very low carb meal. If only I can keep up with sort of diet, I would be in better shape in time for Chinese New Year. Oh yes, next month December is a time for resolutions, no?


Chicken and Spinach Soup
Recipe source : You don't really need a recipe

Ingredients :
- 2 chicken legs
- 6 cloves garlic, peeled and left whole
- 1 inch ginger, lightly smashed
- 1 carrot, peeled and sliced
- spinach (baby bayam) as much as you like
- 1 liter water
- 2 Maggi chicken stock cubes

Method :
1. Put all ingredients except spinach into a pot.
2. Bring to a boil and lower heat. Simmer for 45 minutes to an hour.
3. Add spinach and simmer until spinach is tender.


Wednesday, 27 November 2013

Marmalade Chocolate Chip Muffins.......the Aftermath of a Disaster


Want a good laugh? Two weeks ago I baked Marmalade Muffins. I happily put finishing touches to the muffins before placing them into the oven. When I walked back to the dining table, this was what I found :


Melted butter left behind.

Yaaaaarrrrghhhh!!!! I FORGOT TO ADD BUTTER TO THE BATTER!!!!!!! I was dumfounded at 5:30am on a Sunday morning. What was I to do? These muffins are a goner for sure and since they were already in the oven, nothing could be done to save them. Looking on the bright side (in research and development mode) I can now answer this burning question with absolute certainty - can we leave out butter/vegetable oil when baking muffins? The answer my friends, as you all jolly well know, is a resounding NO! But........there is a but.........Swasthi did an Eggless Banana Chocolate Muffin - No Butter, No Oil, No Sugar Recipe so I could be wrong.


With my heart in my stomach (that's what it felt like), I cleared my baking tools and took a peep into the oven. No wonder the muffin cups looked under-filled. But being well behaved muffins, they rose high and proud. When they were done, I dutifully took them out of the oven to cool. I took one out of the pan and gave it a squeeze. It was soft, nothing out of the ordinary. Looks and feels like a normal muffin. But when I took a bite, well, it tasted bleaghh! The texture was dryish. something like "huat kueh" after two days. So there you go, my thesis on muffins with no butter.


Has this ever happened to you? This is not the first time that my ingredients missed the bus. I have left out vanilla essence, pandan essence and baking powder. And there was that other time when I finished blending a spice paste and to my horror saw that the chillies were still sitting pretty in the bowl. But this I would say is the most disastrous yet. My muffins all went into the bin :(


But all is not lost as I am now more vigilant when preparing muffins. I cross check to make sure I don't miss anything and it led to these very nice Marmalade Chocolate Chip Muffins. I found the muffin liners last Friday at Tesco and I thought they were rather pretty. But expensive. RM5.90 for only 10 liners.


I opened a new bottle of marmalade and added 1 cup into the batter. I also used 2 tubs of plain yogurt and got worried that the batter might be too wet. But it was just nice after I added flour. I think the muffins looked quite nice studded with extra chocolate chips. I was a bit careless when placing the baked muffins on the cooling rack because one of them took a tumble. Butterfingers!


This fellow did a kamikaze and lost a few chips.

I was very happy with the end product as the muffins were moist and tender. The marmalade did not taste too strong. It's orangey flavor complemented the chocolate very well. And even though I did not add any sugar to the batter, the sweetness from the marmalade and chocolate chips were sufficient to sweeten things up. Of course, for those of you who prefer a sweeter muffin, you may need to add some sugar. 


Marmalade Chocolate Chip Muffins
Recipe Source : A mish mash of the many mufin recipes I sourced from the internet
Makes 12 regular sized muffins

Ingredients :
- 230 grams self raisng flour
- 2 large eggs, lightly beaten
- 95g butter, melted and cooled
- 270ml plain yogurt
- 1 cup marmalade (I used St Dalfour)
- 1 teaspoon vanilla extract
- 1 cup chocolate chips plus extra for topping
(I left out sugar intentionally as I found the ingredients sweet enough. Please add if you prefer sweeter muffins)

Method :
1. Preheat oven to 160C
2. Line muffin pans with paper liners
3. In a mixing bowl add yogurt, eggs, melted butter, marmalade and vanilla extract. Stir to mix.
4. In another mixing bowl, add flour and 1 cup chocolate chips. Mix to coat the chocolate chips with flour and make a well in the centre.
5. Pour the wet ingredients into the flour and lightly fold until just combined. Do not overmix.
6. Scoop batter into lined muffins pans and top each muffin with a few chocolate chips.
7. Bake for 20 to 25 minutes.

Sunday, 24 November 2013

Roast Lime Chicken : AFF Thailand


This roast chicken comes from the book The Ultimate Thai and Asian Cookbook which I believe will come in very handy for the Asian Food Fest event. The cookbook contains recipes from China, Hong Kong, Japan, Thailand, Malaysia, Singapore, Burma, Vietnam and Philippines. 


I have tried this roast chicken before, it must be 3 or 4 years ago when I prepared one of my family Chinese New Year lunch. I can't remember the response towards this dish as there were other dishes prepared and we were all very distracted hah! hah! The marinade is made up of simple ingredients namely garlic, salt, turmeric, coriander and lime juice.


All these (except the lime) are pounded into a paste. Just smear the chicken all over with the paste and then squeeze lime juice over the chicken. What I did was mix the lime juice together with the paste and I added 2 tablespoons of oil. That's just me not capable of following cookbook instructions :)


It's quite therapeutic rubbing the paste all over the chicken. I pretended that I was giving the chicken one of those Balinese massages. I really need a vacation hah! hah!

A very relaxed and well rested chicken.

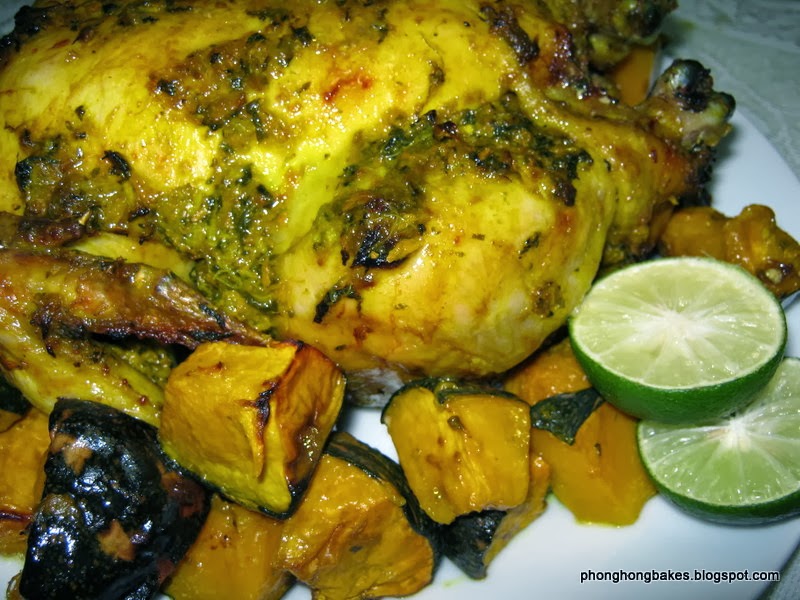
The original title of this recipe is Roast Lime Chicken with Sweet Potatoes. The caption below the heading said "In Thailand this chicken would be spit-roasted, as ovens are seldom used. However, it works very well as a conventional roast. The sweet potatoes are an inspired addition". Ah....so I can use something else other than sweet potatoes and I chose pumpkins.

The roasted pumpkins were yums!!

The overall preparation is simple. I used fresh turmeric from my garden, digging them up from the ground and being careful not to confuse them with what the cat left behind. I placed the pumpkins on the baking tray and put the chicken on top and roasted the whole lot at 180C covered for 1 hour and 20 minutes. For the last 20 minutes, I removed the foil. The result, a delicious and aromatic chicken, tender and juicy and well complimented by the soft and creamy pumpkins.


I did not follow the recipe exactly as I did not prepare any gravy from the roasting juices. I felt that it was not necessary and the chicken was already good as it was. As I had some sambal belacan in the fridge and extra limes, I prepared a simple kerabu to accompany my meal.


Needless to say, I had a very satisfying lunch and dinner. Oh, I did not taste much of the lime in the chicken, perhaps my lime was too small? I did see some big organic limes at Aeon but they were going at RM9.99 for 4 limes. Nope, I wasn't going to spend RM10 for 4 limes. In my future roast, I'll probably use 2 limes and see if there is any difference to the taste.


So, if you are planning on roasting chicken and want to taste something different, try this Thai roasted chicken. You might just find yourself another keeper recipe.


Roast Lime Chicken
Recipe source : Adapted from The Ultimate Thai and Asian Cookbook (page 228)

Ingredients :
- 1 whole chicken
- 6 garlic cloves (3 to be pounded and 3 bruised and left whole)
- 1 small bunch of coriander with roots, coarsely chopped
- 1 tsp ground turmeric
- 2 inch piece fresh turmeric
- 1 lime cut in half, squeeze to extract juice
- 1 tsp salt
- 2 tablespoons vegetable oil
- 500g pumpkin, cut into cubes (optional)

Method :
1. Pound garlic, coriander, turmeric and salt into a paste.
2. Add lime juice and vegetable oil into the paste.
3. Smear the paste all over the chicken.
4. Place the squeezed lime and remaining garlic into the cavity.
5. Place pumpkins (if using) in baking tray and put chicken, breast side up on the pumpkins.
6. Cover the roasting pan with foil.
7. Roast the chicken in a preheated oven at 180C for 1 hour 20 minutes or until cooked. 20 minutes before time, remove the foil and baste chicken with pan juices. Continue to roast until chicken in cooked.


I am submitting this post to Asian Food Fest Thailand November 2013 hosted by Lena of Frozen Wings.


This post is also linked to Cook-Your-Books #6 hosted by Joyce of Kitchen Flavours.

Friday, 22 November 2013

Banana Raisin Muffins


This muffin was meant to be Banana Orange Raisin Muffins. But I was too conservative with the marmalade because I was afraid that it would not be well received by my family. With the benefit of hindsight, I should have just plonked more marmalade into the batter.


My favorite muffin is banana muffin and all I need to do is to add other ingredients for variety. There are so many things that you could add like chocolate chips, nuts, dried fruits, oats and even jam. I have a jar of marmalade that is feeling sad and blue in my fridge. And not wanting to have to throw it out, I had better use it before it expires.


Banana and orange came to mind and just to make sure nobody laughed at me, I did a search on the internet. Ah! There are loads of banana orange muffins recipes and it looks like I wasn't so original after all hah! hah!


One recipe I found on Bakerstreet uses orange marmalade. My muffins had bananas, raisins, too little marmalade and very little sugar. Bananas, raisins and marmalade are already sweet and my Banana Carrot Cake did receive some complaints that it was too sweet. 


Just to dress them up a bit, I sliced some leftover bananas and placed them on top of the muffins just like what I have seen in some of your blogs. I used buttermilk and made sure that I mixed the batter very gently. The previous week, I was a bit too heavy handed and my muffins turned out very dense and doughy. Just fold, scrapping from bottom to top until I don't see any more flour.


The muffins rose very nicely in the oven and I rotated the pan at half time to ensure even baking. When the muffins were cool enough, I bit into one and was happy that it was soft and moist. It tasted very good but I was disappointed that I could not taste the marmalade. It was only at a small spot did the marmalade come through and it tasted very, very, nice indeed.


This is a confirmation to me that I should not worry about piling on the marmalade in my future bake.  I would also increase the amount of raisins as I felt that there wasn't enough. I could have easily eaten three or four of these muffins but.........I had to cut back. PH is too fat :(


Banana muffin lovers, give this muffin a try and if you like the taste of oranges, be generous with the marmalade. If you can, add some orange zest. That would make these muffins heavenly! 


Banana Raisin Muffins
Recipe source : Adapted from here
Makes 12 regular sized muffins.

Ingredients :
- 230grams self raising flour
- 1 cup raisins (I would increase to 2 cups in future)

- 1/4 cup brown sugar (if you have a sweet tooth, add more)
- 2 large eggs, lightly beaten
- 1/2 cup grapeseed oil (or any vegetable oil)
- 1 cup buttermilk
- 2 medium sized bananas, mashed
- Some marmalade, enough to go into the 12 muffins

- extra banana, sliced to decorate (optional)

Method :
1. Preheat oven to 160C
2. Line muffin pans with paper liners.
3. In a mixing bowl add flour and raisins. Stir to coat raisins with flour (this will prevent them from sinking to the bottom of the batter)
4. In another mixing bowl add sugar, eggs, grapeseed oil, buttermilk and mashed bananas. Stir to mix.
5. Pour the wet ingredients into the flour mixture and lightly fold until just combined. Do not over mix.
6. Scoop batter to fill half the muffin liners. Add two teaspoons of marmalade into each of the liners. Then cover with remaining batter.
7. Bake for about 20 to 25 minutes or until skewer inserted into the center of the muffin comes out clean. (Mine were done in 23 minutes)

Monday, 18 November 2013

Thai Pork Leg Stew (Khao Kha Moo): AFF Thailand


The Asian Food Fest (AFF) kicked off last month with Japan and this month it's Thailand in the limelight. Though I love Japanese food, I have not attempted any Japanese dishes at home hence my absence from AFF Japan. But Thai food, ah...that is another matter! I love Thai food very much too but it is something more familiar to me on the home front. 


I have heard quiet a bit about Thai Pork Leg Stew, how delicious it is and that it is a hawker fare in Thailand. Looking at the ingredients, it is quiet similar to our local "Tau Yu Bak" but with additional aromatics such as corriander root, star anise and five spice powder. I had been wanting to attempt this dish for a very long time. It is only now with AFF Thailand as a motivating factor that I finally cooked this very fragrant and delicious stew.


There are many versions of this recipe on the internet. Some recipes call for the aromatics to be sauteed while others say to just simply add them to the boiling water. Since there are two methods, I chose to saute the ingredients as I believe this brings out the flavours and aromas.  The pork leg is supposed to be deep fried first before being simmered but I skipped this step as I find it rather cumbersome.


Verdict? Ooohhh.....yummilicious! The gravy is sweet, salty and so aromatic. It goes so well with plain white rice and the tender pork meat (and fats!) was melt-in-your-mouth bliss! If you are an egg lover like me, be sure to add more hard boiled eggs. They taste pretty good after being simmered in the gravy. This dish tastes even better the next day after the flavours have developed and matured.


In my excitement, I forgot to prepare the chilli sauce that accompanies the stew. But that will have to wait until next time and I can be sure that next time will come in no time!


Thai Pork Leg Stew
Recipe source : Adapted from here

Ingredients :
- 1kg pork leg, cut to chunks
- 1 litre water
- 5 fresh coriander roots
- 5 cloves garlic
- 1 tsp salt
- 1 cinnamon stick
- 2 star anise
- 8 black peppercorns
- 1 tbsp thick dark soya sauce
- 6 tbsp light soya sauce
- 2 tbsp fish sauce
- 2 tbsp palm sugar
- 1 tsp five spice powder
- 5 hard boiled eggs

Method :
1. Pound garlic and corriander roots together with salt and black peppercorns into a paste.
2. Heat oil in pot and saute the pounded paste together with cinnamon stick and star anise until fragrant.
3. Add pork leg and fry until meat changes colour.
4. Add water, light and dark soya sauce, palm sugar, five spice powder and eggs.
5. Bring to a boil and then lower heat to simmer for about 2 hours until meat is tender.
6. Serve with white rice.


I am submitting this post to Asian Food Fest Thailand November 2013 hosted by Lena of Frozen Wings.

Friday, 15 November 2013

Bittergourd Kerabu


Fancy eating bittergourd raw? In the first place, I know that there are people who do not like bittergourd for the obvious reason that it is bitter. The common tip used is to rub the bittergourd slices with salt and rinse it off to remove the bitterness. I have always skipped that step as I do not mind the bitter taste at all (actually it is because I am too lazy). I can't remember exactly when I started to appreciate bittergourd. I think it must be the chicken with bittergourd dish that I tasted at the "chap fan" (mixed rice) stall. It was cooked with chicken and black bean sauce and it was very tasty.


Or it could have been the bittergourd fried with eggs that I ate in a restaurant in Klang. That dish made bittergourd so tasty, with its "wok hei" aroma which reminded me of fried koay teow. Bittergourd has many health benefits the most significant would be its ability to lower blood glucose levels and dietary carbohydrate digestion (I like that!). You can read more about the health benefits here.


I came across Bittergourd Kerabu in Kak Liza's cookbook "Senangnya Memasak.....Kerabu & Salad". Much as I like bittergourd, the thought of eating it raw was not very encouraging. But I had to give it a try before I draw any conclusions. The variety of bittergourd used for this kerabu is commonly known as "peria katak". It is the smaller version of the regular bittergourd that we normally see in the supermarket.


The first time I made this kerabu, I followed Kak Liza's recipe where the dressing is made simply with lime juice, sugar and salt (or fish sauce). I was pleasantly surprised that the kerabu tasted very good in spite of the bitter taste which was not overpowering at all. The important thing to do is to slice the bittergourd as thinly as possible.


This time, I am using sambal belacan and I think it tastes even better. I have added extra corriander leaves as I love the flavor and aroma that it brings to the kerabu. You can of course add other herbs and vegetables as you see fit. This kerabu is very appetizing eaten with just simple plain fried fish. I would not mind exploring other salads using raw bittergourd.


Bitter Gourd Kerabu (Kerabu Peria)
Recipe source : Translated from Senangnya Memasak...Kerabu dan Salad (page 19)
(My notes and adaptations in red)

Ingredients :
- 5 small bittergourds (I used 3)
- 5 red chillies (I omitted)
- 3 green chillies (I omitted)
- 5 cili padi (optional)(I omitted)
- 1/2 carrot (grated)
- 1 big onion
- 1 small bunch corriander
- 3 limes              )
- 1 tbsp sugar     ) See my dressing below
- Salt to taste      )

Method :
1. Slice bittergourd thinly and soak in salt water briefly. Rinse and drain. (I skipped  the soaking)
2.Cut all other vegetables thinly.
3. Mix everything with lime juice, salt and sugar (I mixed with the dressing in note below)
4. Let stand for 15 to 20 minutes.
5. Serve with rice and grilled fish.

Note : For the sambal belacan dressing, I mixed 1 tablespoon sambal belacan, I tablespoon plum sauce, I tablespoon fish sauce with juice of 2 limes (limau nipis).


This post is also linked to Cook-Your-Books #6 hosted by Joyce of Kitchen Flavours.