Saturday, 26 May 2012

Chocolate Buttermilk Sheet Cake with Ganache Frosting


This is the only chocolate cake I have made so far.  I am not of the adventurous persuasion and tend to stick to the tried and tested. Just like my Mum.  My Dad once quipped "Your Mummy has more than 100 cookbooks but we always eat the same old thing".  Growing up, we never complained about the "same old thing" because these dishes were delicious and till today it is what we look forwards to whenever we go back home.  


Since I have started this blog, I am motivated to try more recipes or else I will run out of things to write.  And yes, I will share my Mum's tried and tested recipes in my future posts.  My Mum is oblivious to this blog but perhaps one day I will tell her.  And I bet she'll tell my Dad "Eh, my same old thing has gone viral".


Now back to the cake.  The original recipe is from Diana's Desserts and I have adapted in terms of the sugar content and pan size.  The original recipe calls for 2 cups of flour to 2 two cups of sugar. Equal amounts of flour and sugar is to me a disaster of diabetic proportions.  And when I baked in a 9 x 13 inch pan, the batter was spread so thin that it became dry and crumbled.  So I baked the cake using a 9 x 9 inch pan and it was a lot better.  I also used ganache as the original frosting contains way too much sugar.  


To make the cake, this is what you need.


Wet ingredients :
1.  1/2 cup unsalted butter (113g)
2.  1 cup water
3.  1/2 cup vegetable oil (I used grapeseed oil)
4.  1/2 cup buttermilk
5.  2 large eggs
6.  1 tsp vanilla extract


Dry ingredients :
1.  1/2 cup unsweetened cocoa powder
2.  2 cups self raising flour
3.  1/2 cup sugar (if prefer sweeter use 3/4 cup or more)
4.  1/2 tsp salt
5.  1/2 tsp ground cinnamon


Method :
1.  Preheat oven to 180C (I used 150C because my oven is cranky just like me)

2.  Line a 9" square pan
3.  In a saucepan melt butter and add water and cocoa powder.  
     Turn off the heat and stir to mix well.
4.  Add sugar, salt, cinnamon powder, vegetable oil, buttermilk and vanilla extract.
5. When above mixture is cool, add eggs and stir well
6.  Sift flour into a bowl
7.  Pour the wet ingredients into the flour and use a whisk or    
     spatula to mix until smooth.
8.  Pour batter into pan and bake for 25 to 30 minutes.
9.  Cool the cake in the pan and pour ganache frosting.  When
     ganache is set, remove cake from pan 


Ganache frosting :
1.  100g bittersweet chocolate
2.  100 ml heavy cream
3.  1 tablespoon unsalted butter


Method :
1.  Break chocolate to smaller pieces
2.  Put into a container together with butter
3.  Boil the heavy cream and pour onto the chocolate and
     butter.  Wait for 5 minutes before stirring the mixture


Melting the butter.
Add water, cocoa powder, turn off heat and stir.
Mix wet and dry ingredients until smooth batter forms.
The unholy trinity - chocolate, whipping cream and butter.
Stir ganache after 5 minutes.  Don't panic like I did when you get this thin mixture.  Keep stirring.
Eventually you get this thick, goey, shiny ganache.  Taste it.  It will take you to a happy place.
The end product.  MMMMmmmmmmmm...................

And that's me after one too many.


Saturday, 19 May 2012

Siew Yoke Kerabu


Pork.   I love pork.  No one comes between me and my oinks.  Siew Yoke is, in my humble opinion, a great accompaniment to kerabu.  The salty, crispy cracklings add to the excitement of the already vibrant flavours of the kerabu.  Besides, I am always looking for healthy ways (or rather excuses) to eat my oinks, and what better way to do it than to have it in my kerabu (healthy, mah....got fresh raw vege whaaatt...).


I have always wanted to make my own siew yok and was delighted to find the recipe in Blessed Homemaker.  But that will have to wait for another day.  For now, I'll let An Xin's Healthy MEAT Shoppe do the honours (notice the word "Healthy" ?). 


Today, I paid my healthy meatshop a visit.  "You want the fats??", the young lady asked, eyes wide open in disbelief.  Not to mention the dirty looks from the ladies behind the queue. Yes, I confirmed, the fats.  I'm menopausal and I don't follow rules.  Now, whats the point in eating lean Siew Yoke?  Its the fats that lend the flavour.  Besides, ever since I followed the Atkins eating plan, I have no fear for fats.  Within reasonable limits of course.  I lost 15lbs on the diet and have not looked back since.  And I bought 2 strips of my porkie for RM23.00.


Now, when it comes to kerabu, there are three must have herbs.  Mint, laksa leaves (daun kesum) and local basil (selasih/kemangi).


Shall we proceed ?


What you need is :


1. Cucumber
2. Carrot
3. Pineapple
4. Alfalfa sprouts (I used this instead of the traditional bean sprouts, see I told you its healthy)
5. Onion slices
6. Mint/Kesum/Basil
7. Bunga Kantan


or whatever else you fancy, like young papaya, mango, etc.


For the dressing :


1. Sambal belacan (recipe to follow below)
2. Plum sauce (I come from the East Coast and we like our dressing on the sweet side)
3. Dried prawns, soaked, washed and coarsely pounded
4. Lime juice


Just mix everything together and taste.  The dressing must be sweet, sour and salty.  


Then pour your dressing into the veges and mix.  But don't forget........


                    the Star of the show


Coming from Nyonya stock, I love my sambal belacan in almost everything.  So it makes perfect sense to make a batch to last for the whole week.  I mean, who has the time to prepare sambal belacan everyday?


The ingredients are super simple - red chillies, belacan and some asam jawa juice.


Plonk everything into the blender and whizz away.


Empty contents into a clean bottle.  Always place the bottle on a plate in case you spill, like I did.


The sambal belacan will keep very well in the fridge for up to two weeks.  But mine never lasts that long.  And yes, I ate the whole bowl of kerabu all by myself.  I don't follow rules :)


Sunday, 13 May 2012

Marbled Cheesecake : A Resurrected Post


People, this post was first published in May 2012, my second post after I started this humble blog. But guess what? Madam itchy fingers was fooling around with the editing tools and did not know the difference between Update and Revert to Draft. So I clicked Revert to Draft and the next thing I know my post "disappeared" from my blog. This post is rather nostalgic to me because it brings back my early naive blogging days. And I mean, look at the lousy photos. Frightful angles and poor focus.

I wish to thank WendyAngelSoniaQuay PoElinJessie and Ping for dropping comments in this post back in 2012 as your kind words had encouraged me greatly and brought me so much joy. And I also take this opportunity to thank all my blogger friends and readers. Your friendship and support means a lot to me :)

So I leave you now with this old resurrected post in its original form. 

Phong Hong
15-08-2013


Cheesecake is another one of my favorite cakes to make.  And eat.  I used to think that it was a difficult cake to make.  I would walk into Secret Recipe and lust over the selection of cheesecakes.  Oh my, if I could have a piece of each, I would be whisked into cheesecake Nirvana.  Cheesecake is actually an easy cake to make.  I used to be intimidated by the technical aspects like waterbath, cooling in the oven with door ajar etc, etc.  But now I know that all that complication is not necessary at all.  I learned to make cheesecake from watching videos in particular Laura in The Kitchen and Joy of Baking and of course lots of experiments.  This recipe for marbled cheesecake came from Good Food Channel and after a few attempts, I have made certain adaptations.  Here's my version of the recipe :

Marbled Cheesecake

For the base :
(i) 200g digestive biscuits
(ii) 50g melted butter

For the filling :
(i) 500g cream cheese
(ii) 1/3 cup + 2tbsp castor sugar
(iii) 3 eggs + 1 egg yolk
(iv) 1 cup whipped cream
(v) 1 tbsp custard powder
(vi) 1 tbsp vanilla essence

For chocolate marbling
(i) 2 cubes of chocolate (taken from a block of dark bittersweet chocolate)
(ii) About 3 to 4 tbsp of the cream cheese filling.

Method :

For the base :
- preheat oven to 140C.
- butter an 8" round springform pan.
- crush digestive biscuits finely.
- pour the crushed biscuits into a bowl and add melted butter. Mix well until mixture looks like wet sand.
- pour mixture into the pan and press firmly to compact the base.
- bake for 10 minutes and set aside.

For the filling :
- beat cream cheese until smooth.
- add castor sugar and mix well.
- add eggs one by one and mix well.
- add vanilla essence and custard powder and mix well.
- lastly add whipped cream and mix well.
- pour mixture into springform pan.

For the chocolate marbling :
- melt chocolate and add 3 or 4 tbsp of the cheesecake filling to get a runny chocolate mixture.
- use a teaspoon to spoon drops of chocolate mixture onto the filling and gently swirl to get marbling effect.

Bake for about 50 mins.  The cake is done when the outer ring is firm but the middle is still wobbly.  After taking it out of the oven, run a spatula around the edge of the cake for easy removal later.  Cool the cake completely before chilling in the fridge overnight.

Some personal notes :

1. I did not use a waterbath and did not cool the cake in the oven.  No cracks, yay!
2. To crush the digestive biscuits, I just put them in a freezer bag and crush using the pestle of my trusty mortar.
Put biscuits into bag and bash away.


All you need is a good ole pestle and a fair bit of angst, of which I have plenty of.
Being menopausal does that to you, but let's not go there.

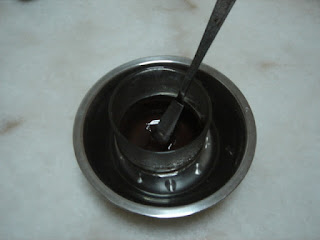
3. To melt the chocolate, I improvised on the double boiler method.  You don't have to do this, can use microwave oven but I am spooked over bad vibes on the micro.  I put my chocolate into a small glass tumbler, placed it in a bowl and poured boiling water into the bowl. And stir.


4. I like to place my springform pan into another pan for easy handling.
This is the base after baking.  Or was it before ?

5. This is how to do the marbling :

Drop spoonfuls of chocolate mixture on surface of cake.


I used my butterspreader (you can use chopstick or whatever) to swirl.

This is the end result, slices of heaven :

Not quite, they are rather blurry.

Tuesday, 1 May 2012

Cotton Soft Japanese Cheesecake : Demystified and Modified


This cake is the bane of my existence.  Imagine nine attempts and I couldn't get it right.  On my first try, the cake looked OK in the oven, rising beautifully.  After I took it out of the oven to cool, Oh My God!  It shrank, all wrinkled up and wet.  I was horrified.  I baked the ugliest cake in the world.  I should have photographed it so that you can see what a failed Japanese Cheesecake should look like.  On my next two or three attempts, slight improvement but still the cake shrank.  So I did my thing on the internet, searching  for a solution to get this right and I stumbled across The Little Teochew.  God bless you my dear Ju.  The tips & tricks were very useful but still, I couldn't get that picture perfect cake.  And the texture was still dense and a bit too moist for my liking.

Well, I tell you, something had to be done. I was obsessed.  I was a woman possessed by this need to bake that perfect cake.  Innovation, woman, innovation!  And that's when I decided to try baking this cake in a chiffon pan.  I know, I know, its not the same, but I tell you my friends, it worked.  No water bath, no lining of the pan.  I baked me a beautiful cake, light and fluffy with minimal shrinkage and with none of the over moist and dense texture.  So here it is, the recipe (from Diana's Desserts) and my take on it :

50g butter
250g cream cheese
100ml milk

140g fine granulated sugar
60g superfine flour (or ordinary cake flour)
20g cornflour
1/4 tsp cream of tartar
1/4 tsp salt (I did not use this)
1 tbsp lemon juice (I did not use this)

6 egg whites
6 egg yolks

1. Put cream cheese, butter and milk into a stainless steel container and stir over a double boiler.  The idea is to melt the cream cheese and butter.  I use a fork to stir and mash the mixture.  Once melted (there will be some lumps but we'll deal with it later) take it off the heat and cool.
2. Once the above mixture is cooled, add the egg yolks and mix well with a whisk.  I added one teaspoon of vanilla essence (not in the original recipe) because frankly, I can't stand the smell of pure butter and cream cheese (sorry folks!).
3. Sift the flour and cornflour into the mixture and mix till combined.  At this point I strain the mixture using a sieve and set it aside.
4. Add cream of tartar to the egg whites and whisk until foamy.  Gradually add sugar and continue to whisk until stiff peaks form (I repeat, stiff peaks).
5. Add the strained egg yolk mixture into the egg white mixture and mix well.  My tip for you is to use your hand (yes, your bare hand, and please wash it first) to mix.  It may sound weird but it works really well.
6. Pour the mixture into a chiffon pan and bake for 45 minutes at 160C.
7. When the cake is done, remove from the oven and invert the pan.
8. When completely cooled, remove from pan.

This is the cake after it was completely cooled in the pan.  Looks ugly but that will be the bottom of the cake.


A slice of the cake.  My photography skills need major improvement,